
Webpack Bundle Analysis
很多时候,为了减少压缩包的体积,加快网站的响应速度,我们必须要对这些压缩包进行分析,最大程度上去减少它的体积。现阶段有很多好用的工具,下面整理下:
- webapck analyse - webpack official
- webpack-chart - Interactive pie chart for webpack stats.
- webpack-visualizer - Visualize and analyze your bundles to see which modules are taking up space and which might be duplicates.
- webpack-bundle-analyzer - A plugin and CLI utility that represents bundle content as a convenient interactive zoomable treemap.
- webpack bundle optimize helper - This tool will analyze your bundle and give you actionable suggestions on what to improve to reduce your bundle size.
- bundle-stats - Generate a bundle report(bundle size, assets, modules) and compare the results between different builds.
这里推荐一个在线网页 - BundlePhobia 👈
部分在线分析工具,需要先在项目中运行
webpack --profile --json > stats.json,然后将生成的 json 文件上传即可 👈
webpack-bundle-analyzer
webpack-bundle-analyzer 是一款打包文件体积可视化且可交互的 webpack 插件,可以帮助我们针对体积较大的压缩文件进行优化操作。首先看下怎么配置:
1、安装
ya -D webpack-bundle-analyzer
2、在 webpack.config.js(或其他文件,只是举例) 中配置
// 1、导入
const BundleAnalyzerPlugin = require('webpack-bundle-analyzer').BundleAnalyzerPlugin
// ...
module.exports = {
  plugins: [
    new BundleAnalyzerPlugin()  // 使用默认配置
    // 默认配置的具体配置项
    // new BundleAnalyzerPlugin({
    //   analyzerMode: 'server',
    //   analyzerHost: '127.0.0.1',
    //   analyzerPort: '8888',
    //   reportFilename: 'report.html',
    //   defaultSizes: 'parsed',
    //   openAnalyzer: true,
    //   generateStatsFile: false,
    //   statsFilename: 'stats.json',
    //   statsOptions: null,
    //   excludeAssets: null,
    //   logLevel: info
    // })
  ]
}
3、在 package.json 的脚本中插入命令
{
  "scripts": {
    "analyse": "NODE_ENV=production npm_config_report=true npm run build"
  }
}
4、直接运行 npm run analyse,自动会在窗口打开 http://127.0.0.1:8888 访问分析结果,并且还能看到与上次相比压缩包的大小增减情况:
39.77 KB (-23.25 KB) build/static/js/2.258f3e7a.chunk.js

减少 lodash 体积
我们以 lodash 为示例,如果我们采用下面这种导入方式,则会引入 lodash 整个文件,这显示是不合理的:
import { set } from 'lodash'
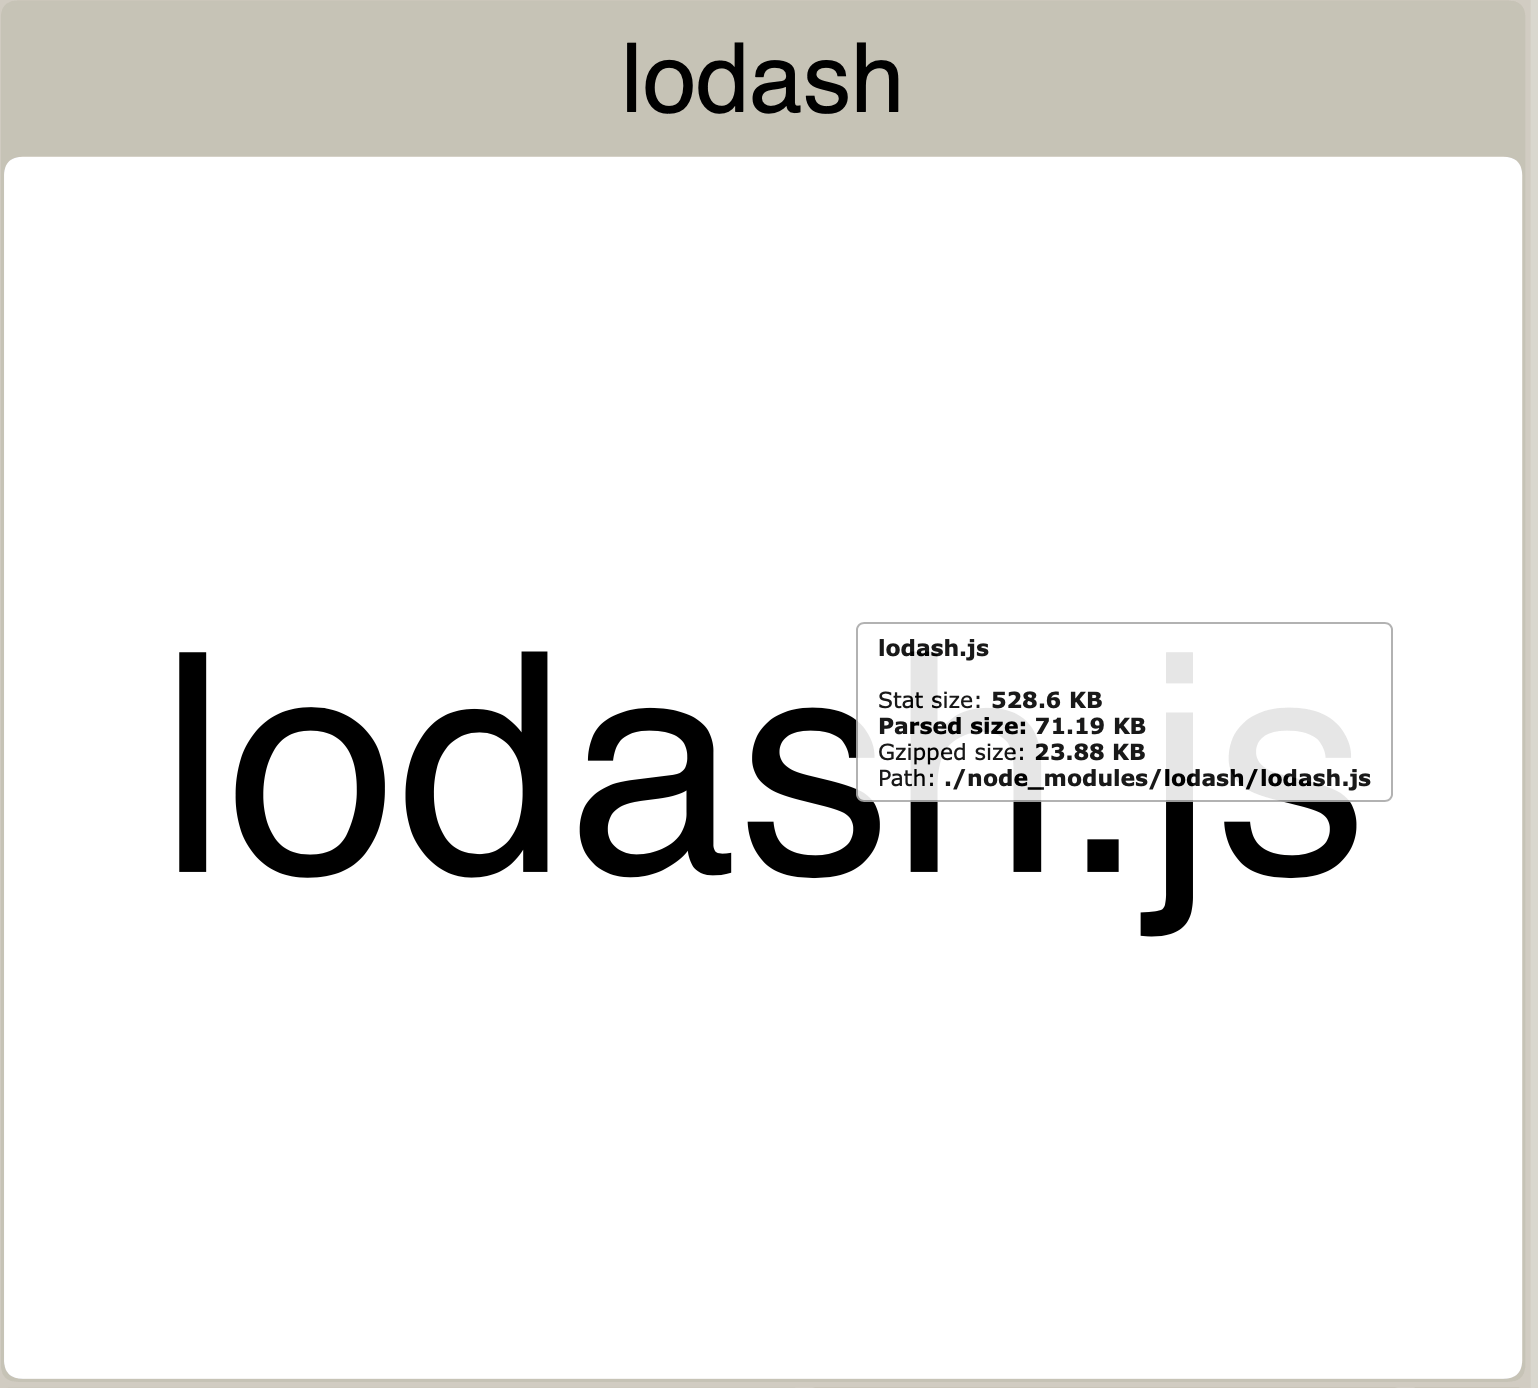
单独引入
我们可以看到不压缩的情况下有 528.6kb,一般情况下怎么解决呢,引入的时候需要这么做:
import set from 'lodash/set'
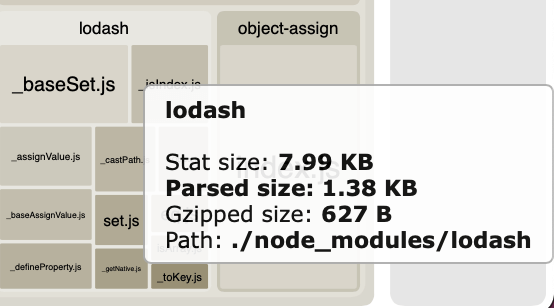
我们再来对比下体积大小,一目了然,直接缩小到了 7.99kb,因为我们只引用了 set 这一个方法。但是这样做有个不方便的地方,就是如果引入很多个方法的时候,每个都要单独去导入,有没有什么方法可以两全其美呢?那就可以用这次要介绍的这个插件。 👇
lodash-webpack-plugin
1、安装
npm i --save-dev lodash-webpack-plugin babel-core babel-loader babel-plugin-lodash babel-preset-env webpack
2、在 webpack.config.js(或其他文件,只是举例) 中配置
// 1、导入
var LodashModuleReplacementPlugin = require('lodash-webpack-plugin')
// ...
module.exports = {
  'module': {
    'rules': [{
      'use': 'babel-loader',
      'test': /\.js$/,
      'exclude': /node_modules/,
      'options': {
        'plugins': ['lodash'], // 2、插件
        'presets': [['env', { 'modules': false, 'targets': { 'node': 4 } }]]
      }
    }]
  },
  'plugins': [
    new LodashModuleReplacementPlugin() // 3、插件
  ]
}
OK,我们接下来修改为最开始的导入方式,即 import { set } from 'lodash',可以看到体积也减小到了 7.99kb,和单独引入一样。
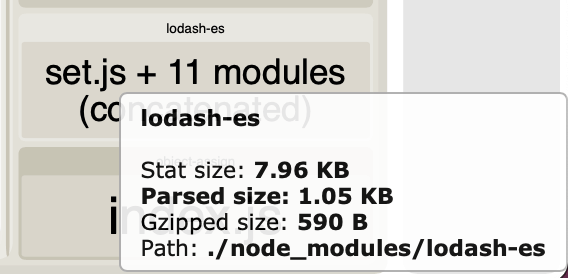
lodash-es
lodash-es 是具备 ES6 模块化的版本,那我们不就可以利用 Tree Shaking 来剔除不需要的引用么,因此我们直接这样写就行了,真香:
import { isEmpty, isObject, cloneDeep } from 'lodash-es'
代码分离 Code Splitting
webpack 能够把代码分离到不同的 bundle 中,即 代码分离(Code Splitting),然后可以按需加载或并行加载这些文件。代码分离可以用于获取更小的 bundle,以及控制资源加载优先级,如果使用合理,会极大影响加载时间。常用的代码分离方法有三种:
- 入口起点(entry point) - 使用 entry 配置手动地分离代码
- 防止重复(prevent duplication) - 使用 SplitChunksPlugin 去重和分离 chunk
- 动态导入(dynamic imports) - 通过模块的内联函数调用来分离代码
入口起点 entry point
这是最简单直观的分离代码的方式。不过,这种方式手动配置较多,目前有一些隐患。先来看看如何从 main bundle 中分离 another module(另一个模块):
// webpack.config.js
const path = require('path');

module.exports = {
  mode: 'development',
  entry: {
    index: './src/index.js',
+   another: './src/another-module.js', // 新增
  },
  output: {
    filename: '[name].bundle.js',
    path: path.resolve(__dirname, 'dist'),
  },
};
则会生成如下构建结果:
            Asset     Size   Chunks             Chunk Names
another.bundle.js  550 KiB  another  [emitted]  another
  index.bundle.js  550 KiB    index  [emitted]  index
Entrypoint index = index.bundle.js
Entrypoint another = another.bundle.js
这种分离方式存在一些问题,比如:
- 如果入口 chunk 之间包含一些重复的模块,那些重复模块都会被引入到各个 bundle 中。比如两者都引入 lodash
- 这种方法不够灵活,并且不能动态地将核心应用程序逻辑中的代码拆分出来。
防止重复 prevent duplication
在入口依赖配置 dependOn option 选项,这样可以在多个 chunk 之间共享模块:
  const path = require('path');

  module.exports = {
    mode: 'development',
    entry: {
-     index: './src/index.js',
-     another: './src/another-module.js',
+     index: { import: './src/index.js', dependOn: 'shared' },
+     another: { import: './src/another-module.js', dependOn: 'shared' },
+     shared: 'lodash', // 公共的依赖模块
      // 'react-vendors': ['react', 'react-dom', 'prop-types']
    },
    output: {
      filename: '[name].bundle.js',
      path: path.resolve(__dirname, 'dist'),
    },
  };
SplitChunksPlugin 插件可以将公共的依赖模块提取到已有的入口 chunk 中,或者提取到一个新生成的 chunk。让我们使用这个插件,将之前的示例中重复的 lodash 模块去除:
const path = require('path');

  module.exports = {
    mode: 'development',
    entry: {
      index: './src/index.js',
      another: './src/another-module.js',
    },
    output: {
      filename: '[name].bundle.js',
      path: path.resolve(__dirname, 'dist'),
    },
+   optimization: {
+     splitChunks: {
+       chunks: 'all',
+     },
+   },
  };
现在应该可以看出,index.bundle.js 和 another.bundle.js 中已经移除了重复的依赖模块。需要注意的是,插件将 lodash 分离到单独的 chunk,并且将其从 main bundle 中移除,减轻了大小:
                          Asset      Size                 Chunks             Chunk Names
              another.bundle.js  5.95 KiB                another  [emitted]  another
                index.bundle.js  5.89 KiB                  index  [emitted]  index
vendors~another~index.bundle.js   547 KiB  vendors~another~index  [emitted]  vendors~another~index
Entrypoint index = vendors~another~index.bundle.js index.bundle.js
Entrypoint another = vendors~another~index.bundle.js another.bundle.js
动态导入 dynamic imports
magic comments
还是针对上述的场景,要分离出 lodash 单独打包,则需要使用到 ES6 的 import 实现动态加载:
async function getComponent() {
  const element = document.createElement('div');
  // 将会打包为 lodash.bundle.js
  const { default: _ } = await import(/* webpackChunkName: "lodash" */ 'lodash');

  element.innerHTML = _.join(['Hello', 'webpack'], ' ');

  return element;
}

getComponent().then(component => {
  document.body.appendChild(component);
});
上面的内联注释,即 magic comments,可以进行诸如给 chunk 命名或选择不同模式的操作:
// Single target
import(
  /* webpackChunkName: "my-chunk-name" */
  /* webpackMode: "lazy" */
  /* webpackExports: ["default", "named"] */
  'module'
);

// Multiple possible targets
import(
  /* webpackInclude: /\.json$/ */
  /* webpackExclude: /\.noimport\.json$/ */
  /* webpackChunkName: "my-chunk-name" */
  /* webpackMode: "lazy" */
  /* webpackPrefetch: true 预获取将来某些导航下可能需要的资源*/
  /* webpackPreload: true 预加载当前导航下所需要的资源*/
  `./locale/${language}`
);

// webpackIgnore:设置为 true 时,禁用动态导入解析,不进行代码分割
import(/* webpackIgnore: true */ 'ignored-module.js');
prefetch / preload
举个例子,比如有一个 HomePage 组件,其内部渲染一个 LoginButton 组件,然后在点击后按需加载 LoginModal 组件:
import(/* webpackPrefetch: true */ 'LoginModal')
这会生成 /<link rel="prefetch" href="login-modal-chunk.js"/> 并追加到页面头部,指示着浏览器在闲置时间预取 login-modal-chunk.js 文件,与 prefetch 指令相比,preload 指令有许多不同之处,浏览器支持程度也可能不同:
preload chunk会在父 chunk 加载时,以并行方式开始加载。prefetch chunk会在父 chunk 加载结束后开始加载。preload chunk具有中等优先级,并立即下载。prefetch chunk在浏览器闲置时下载。preload chunk会在父 chunk 中立即请求,用于当下时刻。prefetch chunk会用于未来的某个时刻。
react-loadable 实践
比如 react 可以使用 react-loadable,这个之前已经介绍过了:
import Loadable from 'react-loadable'
import Loading from './Loading'

const components = {
  ListComponent: Loadable({
    loader: () => import('../list/ListComponent'),
    loading: Loading,
  }),
  LayoutComponent: Loadable({
    loader: () => import('../layout/LayoutComponent'),
    loading: Loading,
  }),
}

export default components
那么 vue 怎么实现的呢?官方给了一段异步组件的代码:
const AsyncComponent = () => ({
  // The component to load (should be a Promise)
  component: import('./MyComponent.vue'),
  // A component to use while the async component is loading
  loading: LoadingComponent,
  // A component to use if the load fails
  error: ErrorComponent,
  // Delay before showing the loading component. Default: 200ms.
  delay: 200,
  // The error component will be displayed if a timeout is
  // provided and exceeded. Default: Infinity.
  timeout: 3000
})
接下来我们创建一个 loadable.js 的高阶组件,利用 render 函数生成组件并返回即可:
import LoadingComponent from './loading.vue'

export default (component) => {
  const asyncComponent = () => ({
    component: component(),
    loading: LoadingComponent,
    delay: 200,
    timeout: 3000
  })
  return {
    render(h) {
      return h(asyncComponent, {});
    }
  }
}
在路由(Vue Router 2.4.0+)中使用该组件:
import loadable from './loadable'

const routes = [{
  path: '/about',
  name: 'about',
  // component: () => import(/* webpackChunkName: "about" */ './views/About.vue')
  component: loadable( () => import(/* webpackChunkName: "about" */ './views/About.vue')
}]
Tree Shaking
side-effect-free
我们经常会遇到这样一种场景,有个 utils 文件定义了很多方法,但是外部文件只引用了其中一部分,而打包的时候,utils 全部打进去了,但其实我们只需要其中用到的一部分而已,这时候就需要用到这里要介绍的 Tree Shaking,它通常用于描述移除 JavaScript 上下文中的未引用代码(dead-code),这个术语和概念实际上是由 ES2015 模块打包工具 rollup 普及起来的。
dead-code 一般具有以下几个特征:
- 代码不会被执行,不可到达
- 代码执行的结果不会被用到
- 代码只会影响死变量(只写不读)
我们第一步要做的是将文件标记为 side-effect-free(无副作用),用来提示 webpack compiler 哪些代码是“纯粹部分”。如果所有代码都不包含 side effect,我们就可以简单地将该属性标记为 false,来告知 webpack,它可以安全地删除未用到的 export:
// package.json
{
  "name": "your-project",
  "sideEffects": false
}
如果你的代码确实有一些副作用,可以改为提供一个数组:
// 数组方式支持相对路径、绝对路径和 glob 模式匹配相关文件
{
  "name": "your-project",
  "sideEffects": [
    "./src/some-side-effectful-file.js",
     "*.css"
  ]
}
注意,所有导入文件都会受到 tree shaking 的影响。这意味着,如果在项目中使用类似 css-loader 并 import 一个 CSS 文件,则需要将其添加到 side effect 列表中,以免在生产模式中无意中将它删除。
这里所提到的副作用可以理解为一个函数会会对函数外部变量产生影响的行为:
function go(url) {
  window.location.href = url
}
我们来看这样一个栗子:
// App.js
import { cube } from './utils.js';
cube(2); // 只有 cube 被调用

// utils.js
export function square(x) { // 会被 shake 掉
  console.log('square');
  return x * x;
}

export function cube(x) {
  console.log('cube');
  return x * x * x;
}
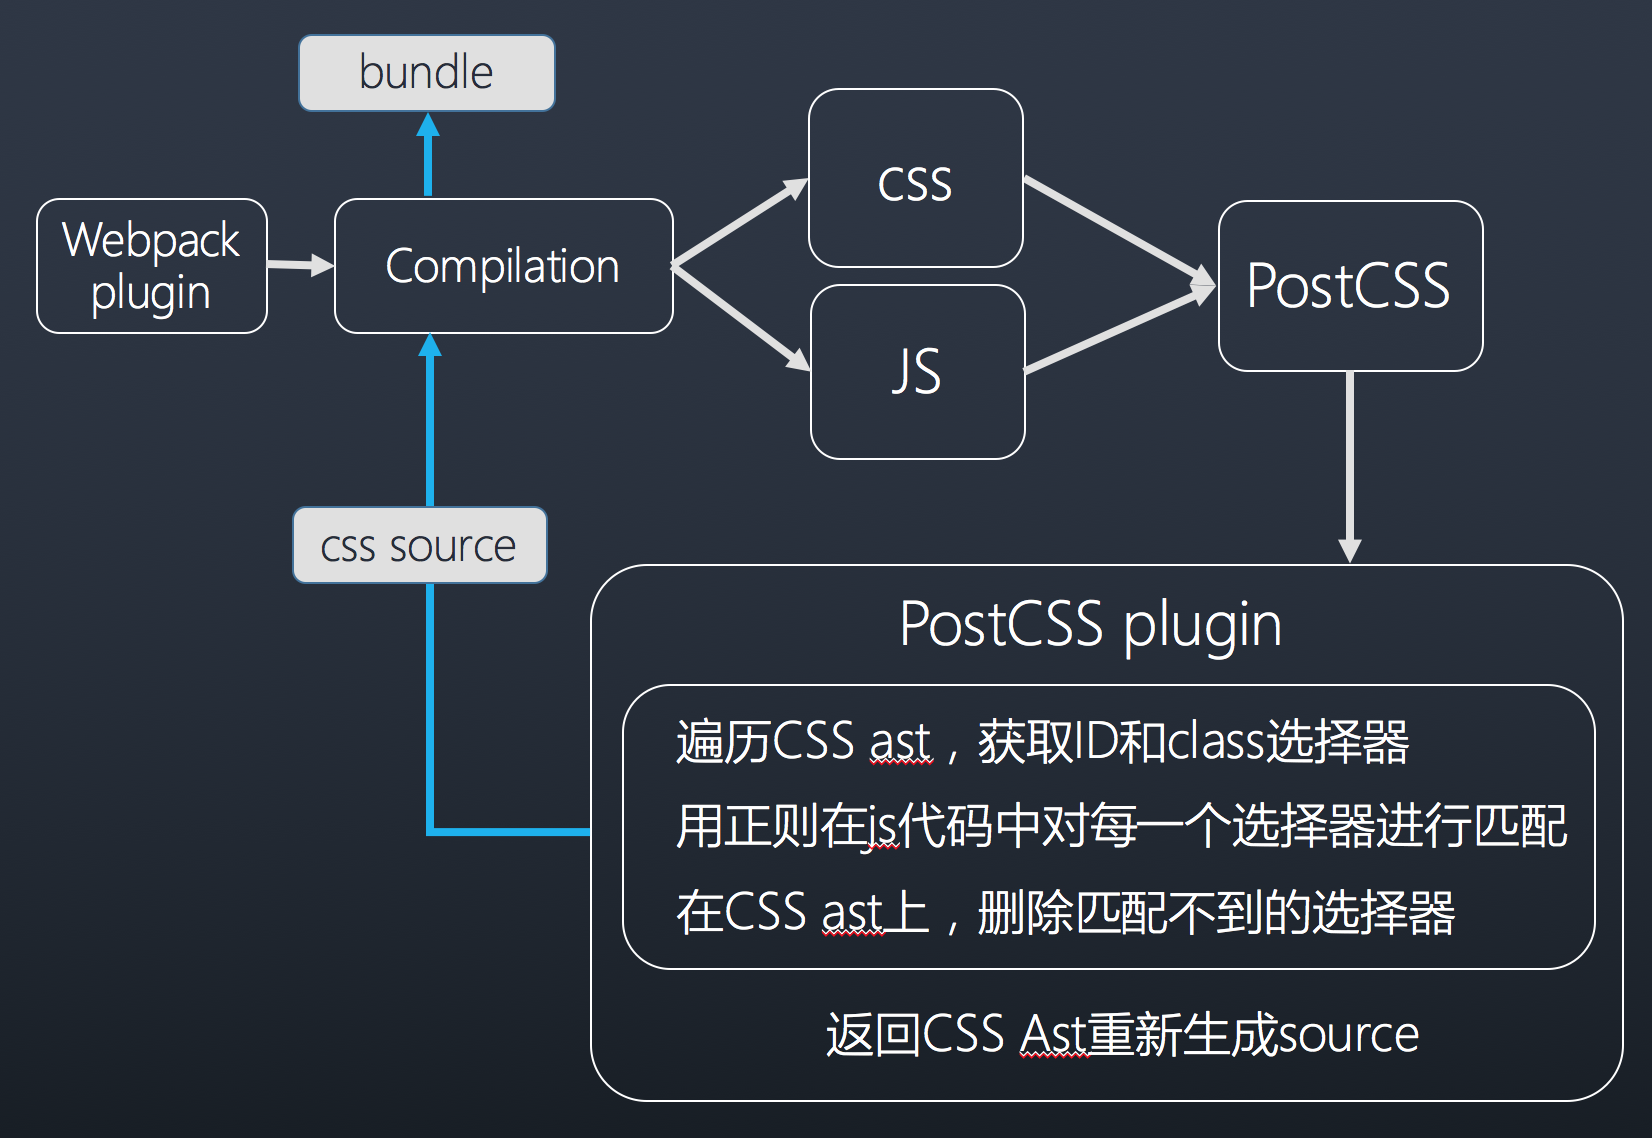
上述的都是针对 js 的优化,也有针对 css 进行优化的,可以参考下第三方的插件 webpack-css-treeshaking-plugin,其核心理念是:
PURE 注释
由于 JS 语法的复杂程度,webpack 没有打算给 JS 实现数据流分析,所以插件是无法知道一个函数调用是否具有副作用的。所以对于一些导出模块,如果是纯的函数调用,则需要加上 /*@__PURE__*/ 注释来表明这个函数是 pure 的,这是 Uglify 使用的方法。当然也可以使用相关的 babel 插件进行批量添加。
注意事项
Tree Shaking 只是尽可能优化我们的项目,但是前提是不影响功能,所以在一些场景中,效果可能不是那么好。
一般情况下,Tree Shaking 对于 IIFE(立即调用函数表达式)是无效的,不会删除。还有一种场景:
// App.js
import { Add } from './utils'
Add(1 + 2);

// utils.js
import { isArray } from 'lodash-es';

// array 方法引用了 isArray,但是方法本身没有被引用
export function array(array) {
  console.log('isArray');
  return isArray(array);
}

export function Add(a, b) {
  console.log('Add');
  return a + b
}
上述这种场景 webpack 无法识别出,但可以使用 webpack-deep-scope-analysis-plugin 插件解决。
terser-webpack-plugin
对于不同环境,我们打包时的策略也不同,比如测试环境不需要压缩,需要上传 sourcemap 以供调试等,可以简单的看个 terser-webpack-plugin 的示例:
module.exports = {
  optimization: {
    minimize: isEnvProduction,
    minimizer: [
      new TerserPlugin({
        terserOptions: {
          parse: {
            // We want terser to parse ecma 8 code. However, we don't want it
            // to apply any minification steps that turns valid ecma 5 code
            // into invalid ecma 5 code. This is why the 'compress' and 'output'
            // sections only apply transformations that are ecma 5 safe
            // https://github.com/facebook/create-react-app/pull/4234
            ecma: 8,
          },
          compress: {
            ecma: 5,
            warnings: false,
            // Disabled because of an issue with Uglify breaking seemingly valid code:
            // https://github.com/facebook/create-react-app/issues/2376
            // Pending further investigation:
            // https://github.com/mishoo/UglifyJS2/issues/2011
            comparisons: false,
            // Disabled because of an issue with Terser breaking valid code:
            // https://github.com/facebook/create-react-app/issues/5250
            // Pending further investigation:
            // https://github.com/terser-js/terser/issues/120
            inline: 2,
          },
          mangle: {
            safari10: true,
          },
          // Added for profiling in devtools
          keep_classnames: isEnvProductionProfile,
          keep_fnames: isEnvProductionProfile,
          output: {
            ecma: 5,
            comments: false,
            // Turned on because emoji and regex is not minified properly using default
            // https://github.com/facebook/create-react-app/issues/2488
            ascii_only: true,
          },
        },
        // Use multi-process parallel running to improve the build speed
        // Default number of concurrent runs: os.cpus().length - 1
        // Disabled on WSL (Windows Subsystem for Linux) due to an issue with Terser
        // https://github.com/webpack-contrib/terser-webpack-plugin/issues/21
        parallel: !isWsl,
        // Enable file caching
        cache: true,
        sourceMap: shouldUseSourceMap,
      }),
    ],
  },
};
DllPlugin / DllReferencePlugin
DLLPlugin / DLLReferencePlugin 将特定的第三方模块提前构建,然后通过页面引入。这不仅能够使得 vendor 文件可以大幅度减小,同时也极大的提高了构件速度。DllPlugin 这个插件会生成一个名为 manifest.json 的文件,这个文件是用来让 DLLReferencePlugin 映射到相关的依赖上去的。
一般情况下,对于 react,react-dom 等这些不会修改的依赖,可以让它和业务代码分开打包。首先我们将这些公用的模块单独打包成一个文件,然后,通过生成的 manifest.json 文件对应,我们需要创建 webpack.config.vendor.js 文件:
// webpack.config.vendor.js
const webpack = require('webpack');
const path = require('path');

const vendor = ['react', 'react-dom', 'lodash-es', ...]

module.exports = {
  entry: {
    vendor,
  },
  output: {
    path: path.join(__dirname, 'dll', 'dist-[hash]'),
    filename: '[name].js',
    library: '[name]',
  },
  plugins: [
    new webpack.DllPlugin({
      context: __dirname,
      path: path.join(__dirname, 'dll', '[name]-manifest.json'),
      name: '[name]_[hash]',
    }),
  ]
};
接下来,为了方便,我们可以在 package.json 脚本中插入命令,然后执行在对应目录打包出静态公共文件:
{
  "scripts": {
    "build:dll": "webpack -p --progress --config path/webpack.config.vendor.js"
  }
}
下一步,我们需要在构建应用的配置文件中,加入我们的 DllPlugin 的配置,这项工作则是由 DllRefrencePlugin 完成的:
// webpack.config.js
const manifest = require('./dll/vendor-manifest.json');
// ...
module.exports = {
  // ...
  plugins: [
    new webpack.DllReferencePlugin({
      context: __dirname, // 注意⚠️,必须跟 DllPlugin 里面设置的 context 上下文一致
      manifest, // 指向上一步生成的 manifest.json 文件
    }),
  ]
};
最后一步,我们把生成的 vendor.js 嵌入到 html 中即可,我们项目中引用模块的方式还是保持不变:
<!-- index.html -->
<script type="text/javascript" src="/config/dll/vendor.js"></script>
再次执行 npm run build,我们可以看到包体积小了很多,构建速度也提升了,当然我们是把他们抽取出来直接嵌入到 html 中了。在接下来的本地开发和线上构建过程,除非我们要更新其中的资源版本,否则不用再重复静态公共资源的构建,极大地缩减我们的构建时间:
2.63 KB (-38.99 KB) build/static/js/2.872399e7.chunk.js
参考链接
- Tree-Shaking 性能优化实践 - 原理篇
- 你的 Tree-Shaking 并没什么卵用 - 相学长
- webpack 如何通过作用域分析消除无用代码 - Vincent Chan