
富文本原理
富文本
contenteditable
contenteditable 是一个枚举属性,表示元素是否可被用户编辑。如果可以,浏览器会修改元素的部件以允许编辑:
<blockquote contenteditable="true">
  <p>Edit this content to add your own quote</p>
  <!-- 子元素不想被编辑,添加 false 即可 -->
  <p contentEditable="false">不能编辑我</p>
</blockquote>

<cite contenteditable="true">-- Write your own name here</cite>
Edit this content to add your own quote
不能编辑我
-- Write your own name here
document.execCommand
document.execCommand 允许运行命令来操纵可编辑内容区域的元素,说人话,当使用 contentEditable 时,调用 execCommand() 将影响当前活动的可编辑元素。语法如下:
/**
 * 返回一个 Boolean ,如果是 false 则表示操作不被支持或未被启用
 *
 * @param {*} aCommandName - 一个 DOMString ,命令的名称
 * @param {*} aShowDefaultUI - 一个 Boolean, 是否展示用户界面,一般为 false
 * @param {*} aValueArgument - 一些命令(如 insertImage)需要额外的参数(insertImage 需要提供插入 image 的 url),默认为 null。
 */
bool = document.execCommand(aCommandName, aShowDefaultUI, aValueArgument)
针对命令名称,我们可以看下默认常用的有哪些,需要注意的是不同浏览器表现可能有所不同,使用的话要考虑到兼容性:
- backColor - 修改文档的背景颜色。在 styleWithCss 模式下,则只影响容器元素的背景颜色。这需要一个
<color>类型的字符串值作为参数传入。注意,IE 浏览器用这个设置文字的背景颜色 - bold - 开启或关闭选中文字或插入点的粗体字效果。IE 浏览器使用
<strong>标签,而不是<b>标签 - copy - 拷贝当前选中内容到剪贴板
- createLink - 将选中内容创建为一个锚链接。这个命令需要一个 hrefURI 字符串作为参数值传入。URI 必须包含至少一个字符,例如一个空格。(浏览器会创建一个空链接)
- cut - 剪贴当前选中的文字并复制到剪贴板
- delete - 删除选中部分
- fontName - 在插入点或者选中文字部分修改字体名称. 需要提供一个字体名称字符串 (例如:”Arial”)作为参数
- fontSize - 在插入点或者选中文字部分修改字体大小. 需要提供一个 HTML 字体尺寸 (1-7) 作为参数
- foreColor - 在插入点或者选中文字部分修改字体颜色. 需要提供一个颜色值字符串作为参数。
- formatBlock - 添加一个 HTML 块式标签在包含当前选择的行, 如果已经存在了,更换包含该行的块元素,需要提供一个标签名称字符串作为参数(例如 “H1”, “P”, “DL”, “BLOCKQUOTE”)
- heading - 添加一个标题标签在光标处或者所选文字上。 需要提供标签名称字符串作为参数 (例如. “H1”, “H6”)
- insertImage - 在插入点插入一张图片并删除选中的部分。需要一个 URL 字符串(可以为 base64)作为参数。这个 URL 图片地址至少包含一个字符。空白字符也可以
- italic - 在光标插入点开启或关闭斜体字。IE 浏览器使用
<em>标签,而不是<i> - justifyCenter - 对光标插入位置或者所选内容进行文字居中。同理还有 justifyLeft、justifyRight 等
- paste - 在光标位置粘贴剪贴板的内容,如果有被选中的内容,会被替换
- redo - 重做被撤销的操作
- removeFormat - 对所选内容去除所有格式
- underline - 在光标插入点开启或关闭下划线
- undo - 撤销最近执行的命令
- unlink - 去除所选的锚链接的
<a>标签
// 加粗
document.execCommand('bold', false, null)
// 添加一个块标签包裹
document.execCommand('formatBlock', false, '<blockquote>')
浏览器会对
contenteditable生成的可编辑区维护一个undo栈和redo栈,使我们能够执行前进和后退的操作
Selection / Range
当我们执行 execCommand 的时候,我们需要指明对哪些选区进行操作,即 Selection,它表示用户选择的文本范围或插入符号的当前位置。文本选区由用户拖拽鼠标经过文字而产生,要获取用于检查或修改的 Selection 对象,请调用 window.getSelection(),它包含了以下术语:
- 锚点(anchor) - 锚指的是一个选区的起始点(注意不同于 HTML 中的锚点链接)。当我们使用鼠标框选一个区域的时候,锚点就是我们鼠标按下瞬间的那个点。在用户拖动鼠标时,锚点是不会变的。
- 焦点(focus) - 选区的焦点是该选区的终点,当您用鼠标框选一个选区的时候,焦点是你的鼠标松开瞬间所记录的那个点。随着用户拖动鼠标,焦点的位置会随着改变。
- 范围(range) - 范围指的是文档中连续的一部分。一个范围包括整个节点,也可以包含节点的一部分,例如文本节点的一部分。用户通常下只能选择一个范围,但是有的时候用户也有可能选择多个范围。“范围”会被作为 range 对象返回。Range对象也能通过 DOM 创建、增加、删减
Selection 对象所对应的是用户所选择的 ranges(区域),俗称拖蓝。默认情况下,该函数只针对一个区域,我们可以这样使用这个函数:
const selObj: Selection = window.getSelection()
const range: Range = selObj.getRangeAt(0) // 获取我们选中的区间
Selection 拥有以下常用的属性:
- anchorNode - 返回该选区起点所在的节点(Node)
- anchorOffset - 返回一个数字,其表示的是选区起点在 anchorNode 中的位置偏移量
- focusNode - 返回该选区终点所在的节点
- focusOffset - 返回一个数字,其表示的是选区终点在 focusNode 中的位置偏移量
- isCollapsed - 返回一个布尔值,用于判断选区的起始点和终点是否在同一个位置
- rangeCount - 返回该选区所包含的连续范围的数量
并且有以下常用方法:
- getRangeAt - 返回选区开始的节点(Node)
- collapse - 将当前的选区折叠为一个点
- addRange - 一个区域(Range)对象将被加入选区
- removeRange - 从选区中移除一个区域
- removeAllRanges - 将所有的区域都从选区中移除
- deleteFromDocument - 从页面中删除选区中的内容
- toString - 返回当前选区的纯文本内容
- containsNode - 判断某一个 node 是否为当前选区的一部分
Range 对象也包含了很多属性和方法,具体可以查阅这里 👈
我们直接用一些例子来对比下选区和相应的属性值:
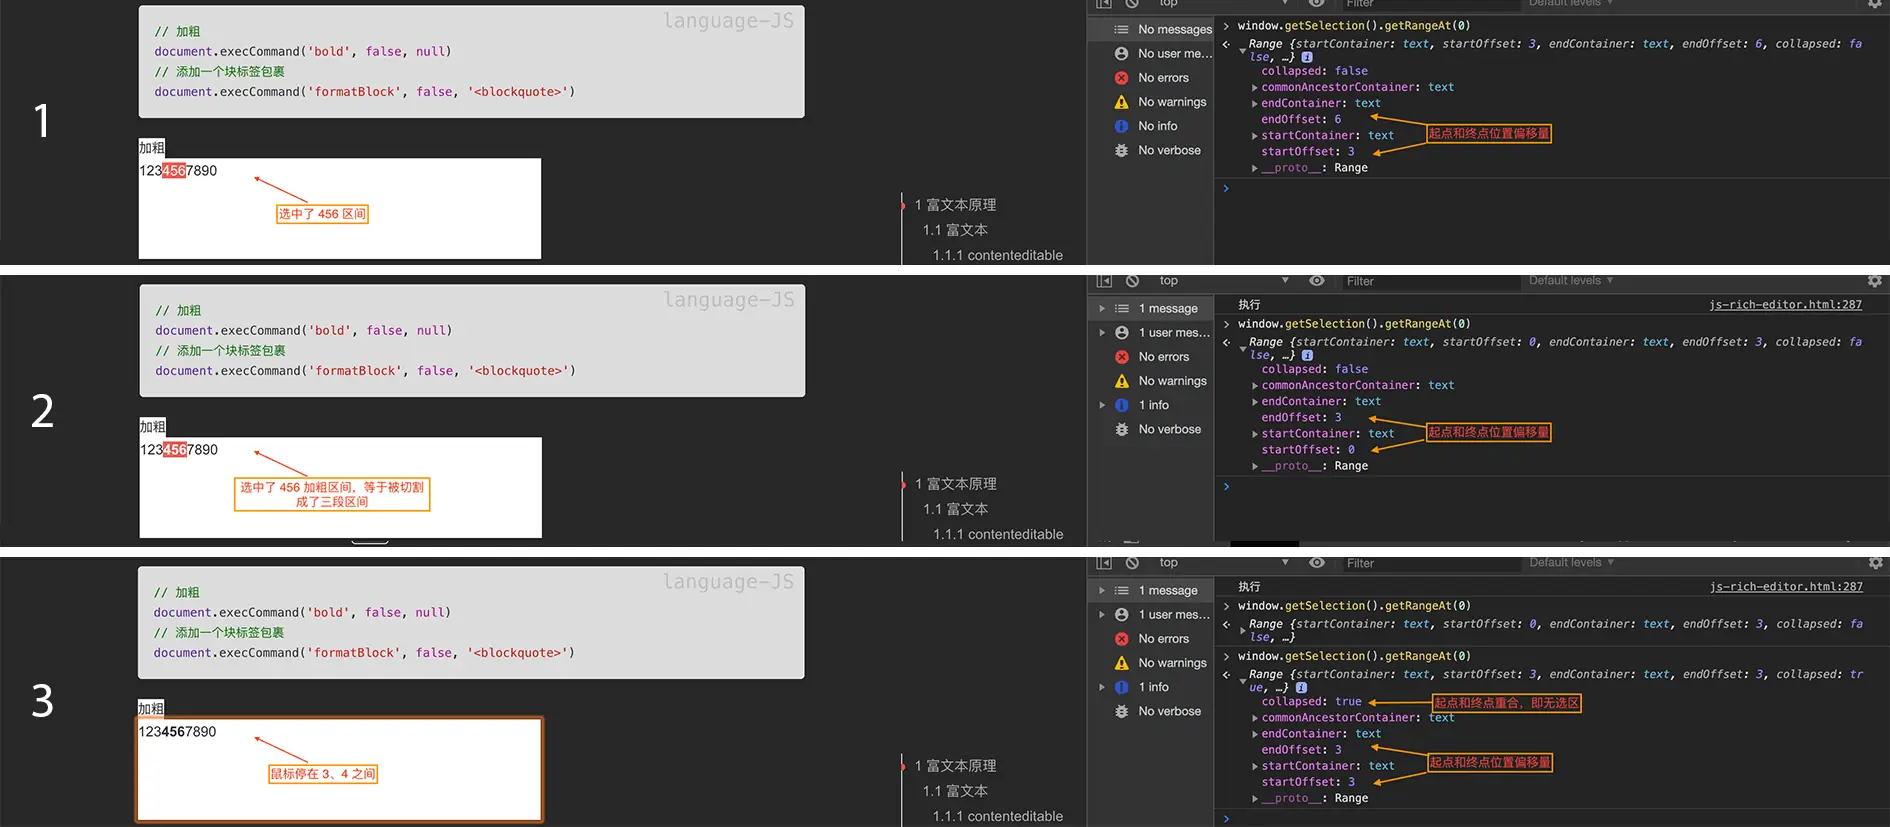
需要注意的是 2 步骤中,如果有一段文本有设置命令,则它会被分割成多个片段
setSelectionRange
上述是我们主动去选择一块儿区域,我们也可以通过 setSelectionRange 来创建一片选区:
/**
 * 每次调用这个这个方法会更新 HTMLInputElement 的 selectionStart, selectionEnd,和 selectionDirection 属性
 *
 * @param {*} selectionStart - 被选中的第一个字符的位置
 * @param {*} selectionEnd - 被选中的最后一个字符的 下一个 位置
 * @param {*} selectionDirection - 一个指明选择方向的字符串,有"forward","backward"和"none" 3个可选值
 */
inputElement.setSelectionRange(selectionStart, selectionEnd, [optional] selectionDirection);
注意,setSelectionRange 只能在一个被 focused 的
<input>元素中选中特定范围的内容,否则无法选中
Tate & Snow Copied
如果不是 input 框呢,我们还可以通过其他方式来实现”隔空拷贝”。可以看是否能选中 Tate & Snow Copied,不行的话试试点击下上面的 “Copy text” 按钮 😄:
const execCopyText: (node: HTMLElement) => void = node => {
  let canUserSelect = true
  const selection = window.getSelection() as Selection
  const range = document.createRange() // 返回一个 Range 对象

  // 不让选也要选
  // 如果是 safari 浏览器,则需要判断 getComputedStyle(node)['-webkit-user-select'],其他同理做兼容性处理
  if (getComputedStyle(node).userSelect === 'none') {
    canUserSelect = false
    node.style.userSelect = 'text'
  }

  // 设置 Range 使其包含一个 Node 的内容
  range.selectNodeContents(node)

  selection.removeAllRanges()
  selection.addRange(range)
  document.execCommand('copy')

  if (!canUserSelect) {
    node.style.userSelect = 'none'
  }
}
简单的富文本实现
我们了解了关于富文本的一些技术实现后,很容易就可以手动撸一个了:
但是我们一定要关注 focus 的状态,只有聚焦在编辑区才能执行相应的命令,因此我们可以定义一些方法来保存和恢复选区的 Range 对象:
let currentRange = null // 当前选区
const saveSelection = () => { // 保存当前 Range 对象
  const selection = window.getSelection()
  if (selection.rangeCount > 0) {
    return selection.getRangeAt(0)
  }
  return null
}
const restoreSelection = () => {
  const selection = window.getSelection()
  if (currentRange) {
    selection.removeAllRanges()  // 清空所有 Range 对象
    selection.addRange(currentRange) // 恢复保存的 Range
  }
}
Draft.js
Draft.js 是 facebook 推出的用于 React 的富文本编辑器框架,是通过 Immutable.js 来保存数据的。一个炒鸡简单的 demo 如下:
import React from 'react'
import ReactDOM from 'react-dom'
import { Editor, EditorState } from 'Draft.js'

function MyEditor() {
  const [editorState, setEditorState] = React.useState(
    EditorState.createEmpty()
  )

  const editor = React.useRef(null)

  function focusEditor() {
    editor.current.focus()
  }

  React.useEffect(() => {
    focusEditor()
  }, [])

  return (
    <div onClick={focusEditor}>
      <Editor
        ref={editor}
        editorState={editorState}
        onChange={editorState => setEditorState(editorState)}
      />
    </div>
  )
}
EditorState
EditorState 是编辑器最顶层的状态对象,它是一个 Immutable Record 对象,保存了编辑器中全部的状态信息,包括文本状态、选中状态等:

当操作 EditorState 对象时,我们不应该直接通过 Immutable 的 API 来获取想要的值,而是通过它暴露出来的静态方法和实例方法:
- getCurrentContent(): ContentState - 返回一个 ContentState 对象,存放的是当前编辑器中的内容
- getSelection(): SelectionState - 返回当前选中的状态
- getCurrentInlineStyle(): DraftInlineStyle - 返回一个代表着编辑器“当前”内联样式的
OrderedSet<string> - static createEmpty(?decorator): EditorState - 创建空的 EditorState 实例
- static createWithContent(contentState, ?decorator): EditorState - 基于 ContentState 和 decorator 返回一个新的 EditorState
- static create(config): EditorState
- static push(editorState, contentState, changeType): EditorState - 返回一个新的 EditorState 对象,该对象使用指定的 ContentState 作为新的当前内容。基于changeType,这个ContentState可能会被视为撤销/重做的边界状态
- static undo(editorState): EditorState - 从 undo 栈 pop 出一个新的 EditorState 对象,更新为当前的 ContentState 对象
- static redo(editorState): EditorState - 同上,只不过是 redo 栈
- static forceSelection(editorState, selectionState): EditorState - 返回一个新的 EditorState 对象,该对象使用指定的 SelectionState,并强制选择被渲染
- static set(editorState, EditorStateRecordType): EditorState
// 创建空的 EditorState 实例
const createEmptyEditorState: (p?: any) => EditorState = decorator =>
  EditorState.createEmpty(decorator)

const createEditorState: (state: ContentState, p?: any) => EditorState = (contentState, decorator) =>
  EditorState.createWithContent(contentState, decorator)

// 基于 raw 来创建 EditorState 对象
const emptyEditorState = isEmptyObject(raw) ? createEmptyEditorState() : createEditorState(convertFromRaw(raw))
ContentState
ContentState 是用来保存编辑器里的全部内容和渲染前后的两个选中状态,常用的方法有:
- getEntityMap(): EntityMap - 返回一个包含所有已创建的 DraftEntity 记录的存储对象 EntityMap
- getBlockMap(): BlockMap - 获取 BlockMap,表示整个文档状态的 ContentBlock 对象组成的完整有序映射
- getBlockForKey(key: string): ContentBlock - 根据 key 返回对应的 ContentBlock 对象
- getFirstBlock() - 获取第一个 ContentBlock 对象,同理有
getLastBlock - getLastCreatedEntityKey(): string - 返回最近一次创建的 DraftEntityRecord 对象的应用 key。因为在 ContentState 对象中可以通过字符串 key 来引用对应的实体对象。应在 CharacterMetadata 对象中使用字符串 key 来标记对应的字符实体
- createEntity(type: DraftEntityType, mutability: DraftEntityMutability, data?: Object): ContentState - 返回 EntityMap 中包含了新建的 DraftEntity 对象的 ContentState 对象
- getEntity(key: string): DraftEntityInstance - 根据 key 返回对应的 DraftEntityInstance 对象
我们可以通过 EditorState.getCurrentContent() 来获取当前的 ContentState,使用 toObject() 转换为普通 javascript 对象后,可以看到它主要包含了 BlockMap 和 EntityMap 有序映射,我们可以分别通过上面提到的 getBlockMap 和 getEntityMap 方法来获取他们:
# blockMap: OrderedMap {size: 6, _map: Map, _list: List, __ownerID: undefined, __hash: undefined}
# entityMap: {0: "1"}
# selectionAfter: SelectionState {_map: Map, __ownerID: undefined}
# selectionBefore: SelectionState {_map: Map, __ownerID: undefined}
那么他们到底是什么呢?通过 convertToRaw(currentContent) 转换后看看其中的内容,这里只有 blocks 和 entityMap 这两项:
# blocks: Array(6)
  0: {key: "dpibs", text: "123", type: "unstyled", depth: "0", inlineStyleRanges: Array(5), …}
  1: {key: "8evo3", text: "", type: "unstyled", depth: "0", inlineStyleRanges: Array(0), …}
  2: {key: "9p4vp", text: "", type: "unstyled", depth: "0", inlineStyleRanges: Array(0), …}
  3: {key: "eigub", text: "tate", type: "unstyled", depth: "0", inlineStyleRanges: Array(2), …}
  4: {key: "607oo", text: "", type: "unstyled", depth: "0", inlineStyleRanges: Array(0), …}
  5:
    data: {}
    depth: "0"
    entityRanges: Array(1)
      0: {offset: 0, length: 4, key: 0}
    inlineStyleRanges: Array(2)
      0: {offset: 0, length: 4, style: "FONTFAMILY-Helvetica"}
      1: {offset: 0, length: 4, style: "LINEHEIGHT-1.5"}
    key: "ff87"
    text: "link"
    type: "unstyled"
# entityMap:
  0:
    data: {url: "www.baidu.com"}
    mutability: "MUTABLE"
    type: "LINK"
可以看到 blocks 这个数组中依次存放了各个 block 的信息,每一个 block 都是一个 ContentBlock 对象。而 entityMap 则包含了所有实体。
ContentBlock
ContentBlock 表示编辑器内容中每一个 block 的完整状态,类似于段落这种块级元素,主要包含了以下几方面:
- key - 标识符,获取方式为
getKey() - type - 这是何种类型的 block,常见的有
unstyled、paragragh、atomic等,获取方式为getType() - text - 纯文字,不包括任何样式、修饰或 HTML 信息,获取方式为
getText() - data - 块级元数据,获取方式为
getData() - entityRanges - 实体
- type - 实体类型
- data - 实体包含的数据
- mutability - 标识实体在用户编辑的时候展现出来的特性
- inlineStyleRanges - 所有内联样式
- offset - 偏移量
- length - 字符长度
- style - 样式类型
- characterList - 是一个 immutable List 列表,其中包含该块中每个字符的 CharacterMetadata 对象,我们通过这种方式用代码来构建块的样式和实体,获取方式为
getCharacterList()
通过在这些 characterList 列表和 CharacterMetadata 对象上大量使用不可变和数据持久化特性,使得在编辑器中编辑内容占用内存很小。当我们创建一个包含 text 但不包含 characterList 的 ContentBlock 对象时,会默认为提供的文本添加一个带有空 CharacterMetadata 对象的 characterList。
CharacterMetadata
CharacterMetadata 表示一个包含单一字符行内样式和实体信息的对象。CharacterMetadata 对象被即时的汇总和共享。如果两个字符拥有相同的行内样式和实体,它们会被表示为相同的 CharacterMetadata 对象。因此,我们只需要尽可能多的组合带有实体 key 的内联样式集合,以达到即便内容的大小和复杂性增加,我们的内存占用也很小的目的。为此,你需要用过提供的静态方法来为 CharacterMetadata 对象创建或应用变更,这能确保最大限度的复用:
- static create(…): CharacterMetadata - 根据提供的配置信息生成一个 CharacterMetadata 对象
- static applyStyle(…): CharacterMetadata - 在 CharacterMetadata 对象上应用指定内联样式
- static removeStyle(…): CharacterMetadata - 从 CharacterMetadata 对象中移除指定内联样式
- static applyEntity(…): CharacterMetadata - 在 CharacterMetadata 对象上应用一个实体 key
比如我要做个选中后清除选区所有内联样式的功能,那我可能会针对所选的 block 中 characterList 进行遍历,清除每一个 CharacterMetadata 对象包含的内联样式信息,那么首先我们要筛选出选中的 block 萌:
const getSelectedBlocks: (state: EditorState) => ContentBlock[] = editorState => {
  const selection = editorState.getSelection()
  const contentState = editorState.getCurrentContent()

  const startKey = selection.getStartKey() // 包含选区起始位置的 block 的 key
  const endKey = selection.getEndKey() // 包含选区结束位置的 block 的 key
  const isSameBlock = startKey === endKey
  const startingBlock = contentState.getBlockForKey(startKey)
  const selectedBlocks = [startingBlock]

  if (!isSameBlock) { // 如果是好多 block
    let blockKey = startKey

    while (blockKey !== endKey) {
      const nextBlock = contentState.getBlockAfter(blockKey)
      selectedBlocks.push(nextBlock)
      blockKey = nextBlock.getKey()
    }
  }

  return selectedBlocks
}
然后我们需要更新 characterList 列表,把空的样式覆盖进去并更新当前的 EditorState:
// 更新 characterList 列表
const updateEachCharacterOfSelection: (state: EditorState, f: any) => any = (editorState, callback) => {
  const selection = editorState.getSelection()
  const contentState = editorState.getCurrentContent()
  const contentBlocks = contentState.getBlockMap()
  const selectedBlocks = getSelectedBlocks(editorState)

  if (selectedBlocks.length === 0) {
    return editorState
  }

  const startKey = selection.getStartKey()
  const startOffset = selection.getStartOffset()
  const endKey = selection.getEndKey()
  const endOffset = selection.getEndOffset()

  const nextContentBlocks = contentBlocks.map((block?: ContentBlock | undefined) => {
    const curBlock = block as ContentBlock
    if (!selectedBlocks.includes(curBlock)) {
      return block
    }

    const blockKey = curBlock.getKey()
    const charactersList = curBlock.getCharacterList()
    let nextCharactersList = null

    if (blockKey === startKey && blockKey === endKey) {
      nextCharactersList = charactersList.map((character, index) => {
        const i = index as number
        if (i >= startOffset && i < endOffset) {
          return callback(character)
        }
        return character
      })
    } else if (blockKey === startKey) {
      nextCharactersList = charactersList.map((character, index) => {
        const i = index as number
        if (i >= startOffset) {
          return callback(character)
        }
        return character
      })
    } else if (blockKey === endKey) {
      nextCharactersList = charactersList.map((character, index) => {
        const i = index as number
        if (i < endOffset) {
          return callback(character)
        }
        return character
      })
    } else {
      nextCharactersList = charactersList.map(character => {
        return callback(character)
      })
    }

    return curBlock.merge({
      characterList: nextCharactersList,
    })
  })

  return EditorState.push(editorState, (contentState as any).merge({
    blockMap: nextContentBlocks,
    selectionBefore: selection,
    selectionAfter: selection,
  }), 'remove-range')
}

// 清除内联样式
const removeSelectionInlineStyles: (state: EditorState) => EditorState = editorState =>
  updateEachCharacterOfSelection(editorState, (characterMetadata: CharacterMetadata) =>
    (characterMetadata as any).merge({
      style: Immutable.OrderedSet([]),
    }),
  )
Entity
文本中会有许多高级的元数据,Entity 实体就是用于表示这些元数据,使得我们可以在内容中添加链接,图片等,链接,提及和嵌入式内容都可以使用实体来实现。在上面 ContentBlock 里有介绍到,它有三个属性:
- type - 实体类型,例如’LINK’,’MENTION’,’PHOTO’。
- mutability - 此属性表示在编辑器中编辑文本范围时,使用此实体对象注释的一系列文本的行为。它拥有以下三种值:
- IMMUTABLE - 如果不从文本中删除实体注释,则无法更改此文本。比如 mention
- MUTABLE - 允许自由改变 Entity 的文本,如超链接
- SEGMENTED - “分段”的实体以与“不可变”实体非常相似的方式与其文本紧密耦合,但允许通过删除进行自定义
- data - 包含实体元数据的可选对象。 例如,“LINK” 实体对象可能包含该链接的 href 的值。
使用 decorator 装饰器或自定义块组件,可以根据实体元数据向编辑器添加丰富的渲染样式
Entity 本身的 create 等方法已经被弃用,直接使用上述 ContentState 对象的 createEntity 代替,其他同理。我们尝试创建和检索实体:
- 通过
contentState.createEntity来创建实体。 - 他接受上面 3 个属性作为参数。
- 此方法返回一个 ContentState 记录。
- 通过
contentState.getLastCreatedEntityKey来获取创建的实体记录的 key
const contentState = editorState.getCurrentContent()
const contentStateWithEntity = contentState.createEntity(
  'LINK',
  'MUTABLE',
  { url: 'http://www.baidu.com' }
)
const entityKey = contentStateWithEntity.getLastCreatedEntityKey()
const currentContent = Modifier.applyEntity(
  contentStateWithEntity,
  selectionState,
  entityKey
)
const newEditorState = EditorState.push(editorState, { currentContent })
对于给定的文本范围,则可以通过在 ContentBlock 对象上使用 getEntityAt() 方法来提取其关联的实体 key,从而传递目标偏移值:
const getEntityKey: (state: EditorState, k?: SelectionState) => string = (editorState, selection) => {
  const selectionState = selection || editorState.getSelection()
  const startKey = selectionState.getStartKey()
  const startOffset = selectionState.getStartOffset()
  return editorState
    .getCurrentContent()
    .getBlockForKey(startKey)
    .getEntityAt(startOffset)
}
Decorator
内联和块级样式并不是我们想要添加到编辑器的唯一富文本样式。例如,Facebook 评论输入给提及和标签提供了蓝色背景高亮。为了支持自定义富文本的灵活性,Draft 提供了一个“修饰器”系统,即 Decorator,我们可以看作是用来添加高级富内容的一种方法。
我们可以使用 CompositeDecorator 类定义所需的修饰器行为。该类允许您提供多个 DraftDecorator 对象,并根据策略依次搜索每一组文本。修饰器存储在 EditorState 记录中。当创建一个新的 EditorState 对象(例如:EditorState.createEmpty())的时候,可以选择提供修饰器参数。当然我们也可以动态区更新这些修饰器:
// 获取 entity type
const getEntityType: (state: ContentState, k: string) => DraftEntityType = (contentState, entityKey) =>
  contentState
    .getEntity(entityKey)
    .getType()

const getEntityData: (state: ContentState, k: string) => any = (contentState, entityKey) =>
  contentState
    .getEntity(entityKey)
    .getData()

// 设置新的修饰器
const turnOffHandleDecorations: (state: EditorState, k: object) => EditorState = (editorState, decorator) =>
  EditorState.set(editorState, { decorator })

function findLinkEntities(contentBlock: ContentBlock, callback: (start: number, end: number) => void, contentState: ContentState) {
  contentBlock.findEntityRanges(
    (character: CharacterMetadata) => {
      const entityKey = character.getEntity()
      return (
        entityKey !== null && getEntityType(contentState, entityKey) === LINK_ENTITY
      )
    },
    callback,
  )
}

const LinkComponent = (props: ILinkProps) => {
  const { contentState, children, entityKey } = props
  const { url } = getEntityData(contentState, entityKey) // 获取实体内容
  return (
    <a target='_blank' onClick={e => previewLink(e, url)} href={url}>
      {children}
    </a>
  )
}

// 定义一些修饰器
const decorator = new CompositeDecorator([
  {
    strategy: findLinkEntities, // 指定策略
    component: LinkComponent, // 指定 React 组件去渲染它们
  },
])

function RichEditor(props: IProps) {
  //...
  const [editorState, setEditorState] = useState<EditorState>(turnOffHandleDecorations(emptyEditorState, decorator))
}
RichUtils
RichUtils 是为实现富文本编辑器准备的一组实用的静态函数集合。在使用中,这些方法接收带有相关参数的 EditorState 对象,并且返回 EditorState 对象,我们常用的如下:
- toggleBlockType(editorState: EditorState, blockType: string): EditorState - 在选中区域上切指定的块级样式
- toggleInlineStyle(editorState: EditorState, inlineStyle: string): EditorState - 在选中区域上切换指定的内联样式。如果用户的选区是折叠的,则应用或移除内部状态的样式
- toggleLink(editorState: EditorState, targetSelection: SelectionState, entityKey: string): EditorState - 切换超链接样式,entityKey 为 null 则为清除
// 切换内联样式,比如 BOLD、ITALIC、UNDERLINE 等
const toggleInlineStyle = (inlineStyle: string) => {
  setEditorState(
    RichUtils.toggleInlineStyle(
      editorState,
      inlineStyle,
    ),
  )
}
对于我们自定义的内联样式,切记如果用户的选区是折叠的,则应用或移除内部状态的样式:
const toggleSelectionInlineStyle: (state: EditorState, p: string, k: string) => EditorState = (editorState, style, prefix = '') => {
  let nextEditorState = editorState
  if (prefix) {
    nextEditorState = updateEachCharacterOfSelection(nextEditorState, (characterMetadata: CharacterMetadata) => {
      // tslint:disable-next-line:max-line-length
      return (characterMetadata as any).toJS().style.reduce((c: CharacterMetadata, characterStyle: string): CharacterMetadata => {
        if (characterStyle.startsWith(prefix) && style !== characterStyle) {
          return CharacterMetadata.removeStyle(c, characterStyle)
        } else {
          return c
        }
      }, characterMetadata)
    })
  }
  return RichUtils.toggleInlineStyle(nextEditorState, style)
}
RichUtils 还提供有关 Web 编辑器可用的核心键盘命令的信息,如 Cmd + B(粗体),Cmd + I(斜体)等。我们可以通过 handleKeyCommand 属性来观察和处理键盘命令,并将它们传入 RichUtils 中来应用或删除所需的样式:
const handleKeyCommand: (p: DraftEditorCommand, k: EditorState) => DraftHandleValue = (command, state) => {
  const newState = RichUtils.handleKeyCommand(state, command)
  if (newState) {
    setEditorState(newState)
    return 'handled'
  }
  return 'not-handled'
}

// 返回的 Editor 组件
<Editor
  handleKeyCommand={handleKeyCommand}
  onChange={state => setEditorState(state)}
/>
Modifier
Modifier 模块是一组实用的静态函数,主要封装 ContentState 对象上的各种常用编辑操作。任何情况下,这些方法都接收具有相关参数的 ContentState 对象,并返回一个新的 ContentState 对象。如果实际并未发生任何编辑行为,将原样返回输入的 ContentState 对象。具体方法可以查看文档,比如 removeInlineStyle 方法可以从整个选中范围中移除指定的内联样式:
// deprecated 可以用上述的 toggleSelectionInlineStyle 优化
const setNextEditorState: (
  state: EditorState, selection: SelectionState, p: IStyleObject, k: EditorChangeType,
) => EditorState = (editorState, selection, reduceStyle, changeType) => {
  // 清除之前的样式
  const nextContentState = Object.keys(reduceStyle).reduce(
    (state, font) => Modifier.removeInlineStyle(
      state, selection, font,
    ), getCurrentContent(editorState),
  )

  // 由 nextContentState 产生新的 editorState
  return EditorState.push(
    editorState,
    nextContentState,
    changeType,
  )
}
数据转换
因为富文本编辑器不可能凭空存在,因此对内容进行保存和传输非常重要,你可能希望将 ContentState 对象转换为原生 JS,或者反过来将原生 JS 转换为 ContentState 对象。目前提供了三个方法:
- convertFromRaw(rawState: RawDraftContentState): ContentState - 将一个原始 state 转换为 ContentState 对象
- convertToRaw(contentState: ContentState): RawDraftContentState - 将一个 ContentState 对象转换为原生 JS 结构,当需要保存编辑器状态、将编辑数据转换为其他格式,或在应用中开发其他功能时,非常有用。
- convertFromHTML - 将一段 HTML 片段转换为一个包含两个 key 的对象。其中一个(contentBlocks)保存 ContentBlock 对象数组,另一个(entityMap)保存对 entityMap 的引用。再从 contentBlocks 和 entityMap 构造 contentState,然后使用该 contentState 更新 editorState
const sampleMarkup =
  '<b>Bold text</b>, <i>Italic text</i><br/ ><br />' +
  '<a href="http://www.facebook.com">Example link</a>'

const blocksFromHTML = convertFromHTML(sampleMarkup)
const state = ContentState.createFromBlockArray(
  blocksFromHTML.contentBlocks,
  blocksFromHTML.entityMap
)

setEditorState(EditorState.createWithContent(state))
emmmm… 是的你没看错,它并没有转换成 html 的方法,因此我们常借助于一些其他库,比如 draft-js-export-html,下面会介绍到详细用法
Draft.js 实战
默认样式
Draft 里面有默认的块级和内联样式,块级比如有 “blockquote”、”code-block”、”ordered-list-item” 等;内联样式比如有 “bold”、”italic”、”underline” 等,我们看其中一个例子:
const BLOCK_TYPES: IRichEditorControls[] = [
  { label: '引用', style: 'blockquote', icon: FormatQuote },
  { label: '无序列表', style: 'unordered-list-item', icon: FormatListBulleted },
  { label: '有序列表', style: 'ordered-list-item', icon: FormatListNumbered },
  { label: '代码块', style: 'code-block', icon: Code },
]

// 获取 block type
const getBlockType: (state: EditorState) => DraftBlockType = editorState =>
  editorState
    .getCurrentContent()
    .getBlockForKey(editorState.getSelection().getStartKey())
    .getType()

interface IProps {
  editorState: EditorState
  onToggle: (p: DraftBlockType) => void
  children?: React.ReactNode
}

function BlockStyleControls(props: IProps) {
  const { editorState, onToggle, children } = props
  const blockType = getBlockType(editorState)

  return (
    <div className='RichEditor-controls'>
      {children}
      {BLOCK_TYPES.map(type => (
        <StyleButton
          key={type.label}
          active={type.style === blockType}
          icon={type.icon}
          label={type.label}
          onToggle={onToggle}
          style={type.style}
        />
      ))}
    </div>
  )
}

export default BlockStyleControls
这里从父组件传入的 onToggle 其实就是上述自定义的 toggleInlineStyle 方法,是不是很简单,而且我们可以直接实现 redo/undo 操作:
const undo: (state: EditorState) => EditorState = editorState =>
  EditorState.undo(editorState)

const redo: (state: EditorState) => EditorState = editorState =>
  EditorState.redo(editorState)

// 只要传过来一个标示即可
const toggleUndoOrRedo = (doStyle: string) => {
  if (doStyle === 'undo') {
    setEditorState(undo(editorState))
  } else {
    setEditorState(redo(editorState))
  }
}
当然我们也可以去修改默认的配置,就要用到下面讲到的 Editor 对象去操作
自定义样式
Editor
在自定义样式前,我们有必要先了解下核心受控的 contentEditable 组件,即 Editor 自身的 API 和 props:
- editorState - EditorState 对象由 Editor 创建
- onChange - 在 Editor 编辑或文本选区(selection)变化的时候触发
- placeholder
- blockRenderMap - 提供了 block 的渲染配置,每个块级样式映射了一个元素标签以及一个可选的 wrapper 元素包裹起来
- blockRendererFn - 可选地设置一个函数来定义自定义块的呈现
- customStyleMap - 可选地设置一个内联样式表,以应用到具有指定样式的文本范围
- customStyleFn - 可选地设置一个函数来将内联样式转换为 CSS 样式并应用到具体指定样式的文本范围
块级样式
这一节主要讲 blockRenderMap 的应用,以“居中、居左”这种功能项为例,我们直接在默认样式里的配置上加入这几种自定义样式:
const BLOCK_TYPES: IRichEditorControls[] = [
  // ...
  { label: '居左', style: ALIGN_KEYS.left, icon: FormatAlignLeft },
  { label: '居中', style: ALIGN_KEYS.center, icon: FormatAlignCenter },
  { label: '居右', style: ALIGN_KEYS.right, icon: FormatAlignRight },
]
然后我们新建一个 Align.ts 文件来定义我们需要用来渲染的组件和样式:
// Align.ts
function Align(props: IProps) {
  const { type, children } = props
  return (
    <div className={'align-' + type}>
      {/* here, children contains a <section> container, as that was the matching element */}
      {children}
    </div>
  )
}

export const ALIGN_KEYS = {
  center: 'align-center',
  left: 'align-left',
  right: 'align-right',
}

// https://draftjs.org/docs/advanced-topics-custom-block-render-map
const blockRenderMap = Immutable.Map({
  [ALIGN_KEYS.center]: {
    wrapper: <Align type='center' />,
  },
  [ALIGN_KEYS.left]: {
    wrapper: <Align type='left' />,
  },
  [ALIGN_KEYS.right]: {
    wrapper: <Align type='right' />,
  },
})

export default blockRenderMap
我们导出了一个 blockRenderMap 对象,我们需要编辑器去应用我们所配置的样式,因此这里需要用到 Editor 对象的 blockRenderMap 属性进行配置:
import { DefaultDraftBlockRenderMap } from 'draft-js'

// 与默认的块级样式合并
const extendedBlockRenderMap = DefaultDraftBlockRenderMap.merge(blockRenderMapAlign)

function RichEditor(props: IProps) {
  // ...
  return {
    // ...
    <Editor
      ref={editor}
      blockRenderMap={extendedBlockRenderMap}
      editorState={editorState}
      onChange={state => setEditorState(state)}
      placeholder='写点什么呢...'
      spellCheck={true}
    />
  }
}
内联样式
这一节主要讲 customStyleMap 和 customStyleFn 的应用,以设置字体为例,我们不妨先针对这个控件创建新的文件:
// FontFamilyControls
const FONTFAMILY_TYPES = [
  { label: '默认', style: 'FONTFAMILY-inherit' },
  { label: 'Arial', style: 'FONTFAMILY-Arial' },
  { label: 'Artnext', style: 'FONTFAMILY-Artnext' },
  { label: 'Avenir', style: 'FONTFAMILY-Avenir' },
  { label: 'Banghdad', style: 'FONTFAMILY-Banghdad' },
  { label: 'Helvetica', style: 'FONTFAMILY-Helvetica' },
  { label: 'Muli', style: 'FONTFAMILY-Muli' },
  { label: 'SF ui test', style: 'FONTFAMILY-SF ui test' },
  { label: 'PingFangSC', style: 'FONTFAMILY-PingFangSC' },
  { label: '思源黑体', style: 'FONTFAMILY-Souce Han Sans CN' },
]

const defaultValue = 'FONTFAMILY-inherit'

interface IProps {
  editorState: EditorState
  saveCurrentSelection: () => void // 保存选区
  onToggle(p: string, k: string): void
}

function FontFamilyControls(props: IProps) {
  const { onToggle, saveCurrentSelection, editorState } = props
  const classes = useStyle()
  const [currentValue, setCurrentValue] = useState<string>(defaultValue)
  const inputLabel = useRef<HTMLLabelElement>(null)
  const [labelWidth, setLabelWidth] = useState(0)

  useEffect(() => {
    setLabelWidth(inputLabel.current!.offsetWidth)
  }, [])

  const getFontFamilyFromStyle: (p: string) => string = style => style.replace(fontFamilyKey, '')

  const onChoose = (e: React.ChangeEvent<{ value: unknown }>) => {
    const { target: { value = '' } = {} } = e
    saveCurrentSelection()
    onToggle(value as string, fontFamilyKey)
  }

  const fontFamilyStyle: (p: string) => React.CSSProperties = style => ({
    fontFamily: getFontFamilyFromStyle(style),
  })

  return (
    <FormControl variant='outlined' className={classes.formControl}>
      <InputLabel ref={inputLabel} htmlFor='select-outlined-label'>字体</InputLabel>
      <Select
        value={currentValue}
        onChange={onChoose}
        MenuProps={HigherMenuProps}
        input={<OutlinedInput labelWidth={labelWidth} name='style' id='select-outlined-label' />}
      >
        {FONTFAMILY_TYPES.map(({ style, label }: IFontSize) => (
          <MenuItem key={label} style={fontFamilyStyle(style)} value={style}>{label}</MenuItem>
        ))}
      </Select>
    </FormControl>
  )
}
我们可以看到,最终实现的也是 toggle 方法,让我们看看父组件里面怎么实现吧:
// 切换字体大小,将此方法传入子组件,属性为 toggle
const changeFont: (p: string, k: string) => void = (inlineStyle, key) => {
  // 储存选择过的颜色,是为了在去除掉以前的样式中用
  let newStyleMap = {}
  const value = getStyleValue(inlineStyle) // 根据内联样式获取对应的 css 样式值

  // 假设这里对字体、字体大小和行高等样式进行处理
  if (key === fontSizeKey) {
    newStyleMap = {
      [inlineStyle]: {
        fontSize: `${value}px`,
      },
    }
  } else if (key === fontFamilyKey) {
    newStyleMap = {
      [inlineStyle]: {
        fontFamily: value,
      },
    }
  } else if (key === lineHeightKey) {
    newStyleMap = {
      [inlineStyle]: {
        lineHeight: value,
      },
    }
  }

  // 更新自定义颜色
  setCustomStyleMap({ ...customStyleMap, ...newStyleMap })
  // 清除旧样式并更新新样式
  setEditorState(toggleSelectionInlineStyle(editorState, inlineStyle, key))
  clearCurrentSelection()
}
我们可以看到,我们使用了钩子 setCustomStyleMap 来设置了自定义的内联样式,那么同样我们还是需要 Editor 的 customStyleMap 配置来应用这些样式:
<Editor
  ref={editor}
  blockRenderMap={extendedBlockRenderMap}
  blockStyleFn={getBlockStyle}
  customStyleMap={customStyleMap}
  customStyleFn={customStyleFn}
  editorState={editorState}
  onChange={state => setEditorState(state)}
  placeholder='写点什么呢...'
  spellCheck={true}
/>
但是有一点需要注意的是,我们新增的自定义样式都是临时的,是根据不同样式类型自动生成的,当我们关闭编辑器保存内容后重新打开时,这些样式如果没有被保存的话,将无法按照它来渲染,因为我们需要 customStyleFn 来定义渲染规则:
// 设置样式 key
const styleKeys = {
  fontSizeKey: 'FONTSIZE-',
  fontFamilyKey: 'FONTFAMILY-',
  fontColorKey: 'COLOR-',
  fontBgColorKey: 'BGCOLOR-',
  lineHeightKey: 'LINEHEIGHT-',
}

const removeKey: (p: string) => string = key => key.replace('Key', '')

const getFirstElement = (styles: DraftInlineStyle) => {
  const styleElement: IInlineStyleElement = {}
  Object.keys(styleKeys).forEach((key: string) => {
    // styles is immutable
    (styleElement as any)[removeKey(key)] = styles.filter((value: any) => value.startsWith((styleKeys as any)[key])).first()
  })
  return styleElement
}

const customStyleFn: (p: DraftInlineStyle) => any = style => {
  const output: any = {}
  // styles immutable
  const { getFirstElement, getStyleValue } = stateToHtmlOptions
  const {
    fontColor, fontBgColor, fontSize, fontFamily, lineHeight,
  } = getFirstElement(style)

  if (fontColor) { output.color = getStyleValue(fontColor) }

  if (fontBgColor) { output.backgroundColor = getStyleValue(fontBgColor) }

  if (fontSize) { output.fontSize = `${getStyleValue(fontSize)}px` }

  if (fontFamily) { output.fontFamily = getStyleValue(fontFamily) }

  if (lineHeight) { output.lineHeight = getStyleValue(lineHeight) }

  return output
}
ok 完事,至于其他超链接的实现这里就不展示了,上面再讲 entity 的时候,代码已经贴的差不多了。剩下的就是如何导出我们写好的富文本了。
导出 html
当我们导出 html 标签的时候,我们又需要对不同样式类型进行解析和转换,这里推荐一个库 draft-js-export-html,使用方法很简单:
import {stateToHTML} from 'draft-js-export-html'

const html = stateToHTML(contentState, options)
它支持众多的 options 可选项,具体可以查阅文档,我们这里直接贴例子:
const options = {
  defaultBlockTag: 'div',
  inlineStyleFn: (styles: DraftInlineStyle) => {
    // styles immutable
    const {
      fontSize, fontColor, fontBgColor, fontFamily, lineHeight,
    } = getFirstElement(styles)

    let style = {}

    if (fontSize) {
      style = { ...style, 'font-size': getStyleValue(fontSize) }
    }

    if (fontFamily) {
      style = { ...style, 'font-family': getStyleValue(fontFamily) }
    }

    if (fontColor) {
      style = { ...style, color: getStyleValue(fontColor) }
    }

    if (fontBgColor) {
      style = { ...style, 'background-color': getStyleValue(fontBgColor) }
    }

    if (lineHeight) {
      // FIXME: 为了防止自动加上 px,所以暂时采用 !important
      style = { ...style, 'line-height': `${getStyleValue(lineHeight)} !important` }
    }

    if (!isEmptyObject(style)) {
      return {
        element: 'span',
        style,
      }
    }

    return styles
  },
  blockStyleFn: (block: ContentBlock) => {
    let output
    switch (block.getType()) {
      case ALIGN_KEYS.center:
        output = getAlignStyle('center')
        break
      case ALIGN_KEYS.left:
        output = getAlignStyle('left')
        break
      case ALIGN_KEYS.right:
        output = getAlignStyle('right')
        break
      default:
        break
    }

    return output
  },
  entityStyleFn: (entity: EntityInstance) => {
    if (entity.getType() === LINK_ENTITY) {
      const { url: href } = entity.getData()
      return {
        element: 'a',
        attributes: {
          href,
          target: '_blank',
        },
        // style: {
        //   // Put styles here...
        // },
      }
    }
  },
}
这样转换之后,我们就可以得到我们心爱的 html 文本啦,赶紧拿去前台渲染吧 😁
基于 draft.js 开发的也有好多好用的插件和成熟的富文本工具,比如 braft-editor 等,其他关于富文本的库也有很多,比如 squire 等。
参考链接
- 富文本原理了解一下? By 尤水就下
- 从插入图片功能的实现来介绍如何用 Draft.js 编写富文本编辑器 By 吴锴
- Draft.js 中文翻译文档