
NPM Scripts
NPM Scripts
package.json
package.json 文件定义了项目所需要的依赖模块和配置信息。可以通过 npm init 命令来创建 package.json 文件,使用参数 -f 可跳过此问答环节:
npm init

# 跳过问答环节,快速创建
npm init -f
当然也可以在初始化前通过 npm config 命令去修改默认配置,之后通过初始化时都会套用此配置项:
npm config set init.author.name "tate"
npm config set init.author.email "smd.tate@gmail.com"
npm config set init.license "MIT"
# 查看所有 npm 配置
npm config list
创建的 package.json 文件大致如下:
{
  "name": "npm_scripts",
  "version": "1.0.0",
  "description": "tate",
  "main": "index.js",
  "scripts": {
    "test": "echo \"Error: no test specified\" && exit 1"
  },
  "author": "tate <smd.tate@gmail.com>",
  "license": "MIT"
}
lockfile
lockfileVersion
为了在多人开发中避免安装的依赖不一致而导致各种环境问题,因此会用到锁文件来锁定依赖版本。如 package-lock.json 或者 yarn.lock。package-lock.json 和 node_modules 目录结构是一一对应的,我们先来看下大致结构:
{
  "name": "my-app",
  "version": "1.0.0",
  "dependencies": {
    "base64-js": {
      "version": "1.0.1",
      "resolved": "https://registry.npmjs.org/base64-js/-/base64-js-1.0.1.tgz",
      "integrity": "sha1-aSbRsZT7xze47tUTdW3i/Np+pAg="
    },
    "buffer": {
      "version": "5.4.3",
      "resolved": "https://registry.npmjs.org/buffer/-/buffer-5.4.3.tgz",
      "integrity": "sha512-zvj65TkFeIt3i6aj5bIvJDzjjQQGs4o/sNoezg1F1kYap9Nu2jcUdpwzRSJTHMMzG0H7bZkn4rNQpImhuxWX2A==",
      "requires": {
        "base64-js": "^1.0.2",
        "ieee754": "^1.1.4"
      },
      "dependencies": {
        "base64-js": {
          "version": "1.3.1",
          "resolved": "https://registry.npmjs.org/base64-js/-/base64-js-1.3.1.tgz",
          "integrity": "sha512-mLQ4i2QO1ytvGWFWmcngKO//JXAQueZvwEKtjgQFM4jIK0kU+ytMfplL8j+n5mspOfjHwoAg+9yhb7BwAHm36g=="
        }
      }
    },
    "ieee754": {
      "version": "1.1.13",
      "resolved": "https://registry.npmjs.org/ieee754/-/ieee754-1.1.13.tgz",
      "integrity": "sha512-4vf7I2LYV/HaWerSo3XmlMkp5eZ83i+/CDluXi/IGTs/O1sejBNhTtnxzmRZfvOUqj7lZjqHkeTvpgSFDlWZTg=="
    },
    "ignore": {
      "version": "5.1.4",
      "resolved": "https://registry.npmjs.org/ignore/-/ignore-5.1.4.tgz",
      "integrity": "sha512-MzbUSahkTW1u7JpKKjY7LCARd1fU5W2rLdxlM4kdkayuCwZImjkpluF9CM1aLewYJguPDqewLam18Y6AU69A8A=="
    }
  }
}
- resolved - 包具体的安装来源
- integrity - 包 hash 值,基于 Subresource Integrity 来验证。用户下载依赖包到本地后,需要确定在下载过程中没有出现错误,所以在下载完成之后需要在本地在计算一次文件的 hash 值,如果两个 hash 值是相同的,则确保下载的依赖是完整的,如果不同,则进行重新下载
- requires - 对应子依赖的依赖,与子依赖的 package.json 中 dependencies 的依赖项相同
并不是所有的子依赖都有 dependencies 属性,只有子依赖的依赖和当前已安装在根目录的 node_modules 中的依赖冲突之后,才会有这个属性。具体可以参考 pnpm 扁平化一节
npm 里锁文件还有个 lockfileVersion 属性,不同 npm 版本安装的版本号可能不同:
- No version provided: an “ancient” shrinkwrap file from a version of npm prior to npm v5.
- v1 => npm v5&v6.
- v2: => npm v7&v8, which is backwards compatible to v1 lockfiles.
- v3: => npm v7&v8 without backwards compatibility
The lockfile v2 unlocks the ability to do deterministic and reproducible builds to produce a package tree.
Running npm install with npm 7 in a project with a v1 lockfile will replace that lockfile with the new v2 format. To avoid this, you can run
npm install --no-save
我们经常会遇到一个问题,比如 a 同学用 npm v7 提交了锁文件上去,其他同学用的 npm v6,这时候就会出现以下提示。所以团队里面尽量保证 npm 版本一致:
npm WARN read-shrinkwrap This version of npm is compatible with lockfileVersion@1, but package-lock.json was generated for lockfileVersion@2. I’ll try to do my best with it!
npm-shrinkwrap.json
npm-shrinkwrap.json 与 pacakge-lock.json 功能类似,同时存在的情况下,前者优先级更高,后者会被忽略。不同点如下:
| 差别 | npm-shrinkwrap.json | pacakge-lock.json |
|---|---|---|
| 版本 | before npm v5 | after npm v5 |
| 发布 | 允许 | 不允许 |
| 优先级 | 高 | 低 |
npm-shrinkwrap.json allows publication, and defines the dependency tree from the point encountered. This is not recommended unless deploying a CLI tool or otherwise using the publication process for producing production packages.
缓存
在执行 npm install 或 npm update 命令下载依赖后,除了将依赖包安装在 node_modules 目录下外,还会在本地的缓存目录缓存一份。通过 npm config get cache 命令可以查询到:在 Linux 或 Mac 默认是用户主目录下的 .npm/_cacache 目录。我们简单看下这个结构:
{
  "key": "pacote:version-manifest:https://registry.npmjs.org/base64-js/-/base64-js-1.0.1.tgz:sha1-aSbRsZT7xze47tUTdW3i/Np+pAg=",
  "integrity": "sha512-C2EkHXwXvLsbrucJTRS3xFHv7Mf/y9klmKDxPTE8yevCoH5h8Ae69Y+/lP+ahpW91crnzgO78elOk2E6APJfIQ==",
  "time": 1575554308857,
  "size": 1,
  "metadata": {
    "id": "base64-js@1.0.1",
    "manifest": {
      "name": "base64-js",
      "version": "1.0.1",
      "engines": {
        "node": ">= 0.4"
      },
      "dependencies": {},
      "optionalDependencies": {},
      "devDependencies": {
        "standard": "^5.2.2",
        "tape": "4.x"
      },
      "bundleDependencies": false,
      "peerDependencies": {},
      "deprecated": false,
      "_resolved": "https://registry.npmjs.org/base64-js/-/base64-js-1.0.1.tgz",
      "_integrity": "sha1-aSbRsZT7xze47tUTdW3i/Np+pAg=",
      "_shasum": "6926d1b194fbc737b8eed513756de2fcda7ea408",
      "_shrinkwrap": null,
      "bin": null,
      "_id": "base64-js@1.0.1"
    },
    "type": "finalized-manifest"
  }
}
上面的 _shasum 属性 6926d1b194fbc737b8eed513756de2fcda7ea408 即为 tar 包的 hash, hash 的前几位 6926 即为缓存的前两层目录,进去后就能找到压缩后的依赖包。以上的缓存策略是从 npm v5 版本开始的,在 npm v5 版本之前,每个缓存的模块在 ~/.npm 文件夹中以模块名的形式直接存储,储存结构是 {cache}/{name}/{version}。
脚本命令 scripts
package.json 文件里的 scripts 属性下可以自定义执行命令,可以通过命令 npm run 进行查看:
"scripts": {
  "call:tate": "echo tate",
  "call:snow": "echo snow",
}
可以通过符号 && 和 & 实现串行和并行脚本:
// 串行脚本 &&
"test": "npm run call:tate && npm run call:snow && ..."

// 并行脚本 &
"test": "npm run call:tate & npm run call:snow & ..."
运行的脚本比较多的话可以采用 npm-run-all 实现更轻量和简洁的多命令运行:
// 串行脚本
"test": "npm-run-all call:tate call:snow ..."
// 优化
"test": "npm-run-all call:*"

// 并行脚本 --parallel
"test": "npm-run-all call:* --parallel"
传递参数 –
“–” 分隔符用来给实际运行的指令传递额外的参数,举个栗子 🌰:
// 假设要传入一个 watch 参数
"call:tate": "echo tate",
"call:tate:watch": "echo tate --watch",

// 优化。通过 -- 分隔符传参数
// 实际执行的即是 echo tate --watch
"call:tate:watch": "npm run call:tate -- --watch",
钩子 hooks
内置的钩子可分为 pre 和 post 钩子脚本,如下:
"test": "echo tate",
"pretest": "echo pre-tate",
"posttest": "echo post-tate"
当执行命令 npm test 时,实际执行了 “pretest ==> test ==> posttest”。自定义命令也适用。配合 git hooks 可以在提交代码前后进行一些校验输出,这里推荐使用 husky。
"precommit": "npm test",
"prepush": "npm test"
在执行 git commit 命令时,precommit 钩子会自动生效。利用钩子我们可以完成很多事情,比如规范校验、检测冲突阻止提交等。具体栗子可以参考下面 git hooks 实践示例 👇
变量 $npm_package
通过命令npm run env即可查看所有变量列表:
npm run env | grep npm_package | sort
要想在 scripts 内使用变量,不同环境下有两种访问方式,比如访问项目名称 name:
// The following only works on Mac OS X/Linux (bash)
"bash-script": "echo Hello $npm_package_name"
// The following only works on a Windows machine
"win-script": "echo Hello %npm_package_name%"
跨平台使用的话可以使用 cross-var 或更轻量的 cross-var-no-babel:
// 单命令写法
"script": "cross-var echo Hello $npm_package_name"
// 多命令写法
"build:css": "cross-var \"node-sass src/index.scss | postcss -c .postcssrc.json | cssmin > public/$npm_package_version/index.min.css\"",
还有一点需要注意的是,自 npm v7 之后,上述自定义的变量会返回空字符串,解决的办法是套一层 config,可参考 issue 这里:
// 通过 $npm_package_config_port 访问
{
  "config": {
    "port": "2333"
  }
}
跨平台兼容
除了上述的变量,还有文件系统的操作也需要考虑跨平台兼容,比如:
- rimraf 或 del-cli: 用来删除文件和目录,实现类似于
rm -rf的功能; - cpr: 用于拷贝、复制文件和目录,实现类似于
cp -r的功能; - make-dir-cli: 用于创建目录,实现类似于
mkdir -p的功能
"cover:cleanup": "rm -rf coverage && rm -rf .nyc_output",
// 跨平台转换
"cover:cleanup": "rimraf coverage && rimraf .nyc_output"
设置环境变量时可以采用 cross-env:
"test": "NODE_ENV=test mocha tests/",
// 跨平台转换
"test": "cross-env NODE_ENV=test mocha tests/",
但是 cross-env 并不能解决大型项目中自定义环境变量的持久化问题,这里再推荐一个 env-cmd,其缺点是不支持在命令行中自定义环境变量:
# 文件 ./test/.env
ENV1=THANKS
ENV2=FOR ALL
ENV3=THE FISH
{
  "scripts": {
    "test": "env-cmd ./test/.env mocha -R spec"
  }
}
# 命令行
./node_modules/.bin/env-cmd ./test/.env node index.js
对于更复杂的环境,我们在配置文件 .env-cmdrc 中定义环境变量:
{
  "dev": {
    "ENV1": "Thanks",
    "ENV2": "For All"
  },
  "test": {
    "ENV1": "No Thanks",
    "ENV3": "!"
  },
  "prod": {
    "ENV1": "The Fish"
  }
}
{
  "scripts": {
    "test": "env-cmd dev mocha -R spec"
  }
}
# 命令行同时传输多个配置
./node_modules/.bin/env-cmd test,production node index.js
版本号与 SemVer 规范
这里对版本号做一些解释,主要格式为 major.minor.patch ,即主版本号.次版本号.修补版本号,SemVer(Semantic Version) 语义化规范可以参考这里:
- 波浪符号(~) - 会更新到当前 minor version(中间数字)中最新的版本,例如更新 ~1.10.0,这个库会去匹配更新到 1.10.x 的最新版本
- 插入符号(^) - 会更新到当前 major version(首位数字)中最新的版本,例如更新 ^1.10.0,这个库会去匹配更新到 1.x.x 的最新版本
- 不带符号 - 匹配具体版本号
| 序号 | 描述 |
|---|---|
| major | 进行不向下兼容的修改时,递增主版本号 |
| minor | 保持向下兼容,新增特性时,递增次版本号 |
| patch | 保持向下兼容,修复问题但不影响特性时,递增修订号 |
当某个版本改动比较大、并非稳定而且可能无法满足预期的兼容性需求时,你可能要先发布一个先行版本。先行版本号可以加到 主版本号.次版本号.修订号 的后面,先加上一个连接号再加上一连串以句点分隔的标识符和版本编译信息:
- 内部版本(alpha)
- 公测版本(beta)
- 正式版本的候选版本 rc: 即 Release candiate
"dependencies": {
  "async": "1.2.1", # 固定版本
  "chokidar": "^1.0.0",
  "vizion": "latest", # 当前发布版本
  "babel": "^5.x",
  "pm2-logs": "~0.1.1",
  "ikt": "git+http://ikt.pm2.io/ikt.git#master", # Git URL 形式的依赖
  "punt": "*", # 任意版本
  "express": ">=3.0.0",
  "connect": "1.30.2 - 2.30.2",
}
在开发中肯定少不了对一些版本号的操作,如果这些版本号符合 SemVer 规范 ,我们可以借助用于操作版本的 npm 包 semver 来帮助我们进行比较版本大小、提取版本信息等操作:
// 比较版本号大小
semver.gt('1.2.3', '9.8.7') // false
semver.lt('1.2.3', '9.8.7') // true

// 判断版本号是否符合规范,返回解析后符合规范的版本号。
semver.valid('1.2.3') // '1.2.3'
semver.valid('a.b.c') // null

// 将其他版本号强制转换成 semver 版本号
semver.valid(semver.coerce('v2')) // '2.0.0'
semver.valid(semver.coerce('42.6.7.9.3-alpha')) // '42.6.7'

// 一些其他用法
semver.clean('  =v1.2.3   ') // '1.2.3'
semver.satisfies('1.2.3', '1.x || >=2.5.0 || 5.0.0 - 7.2.3') // true
semver.minVersion('>=1.0.0') // '1.0.0'
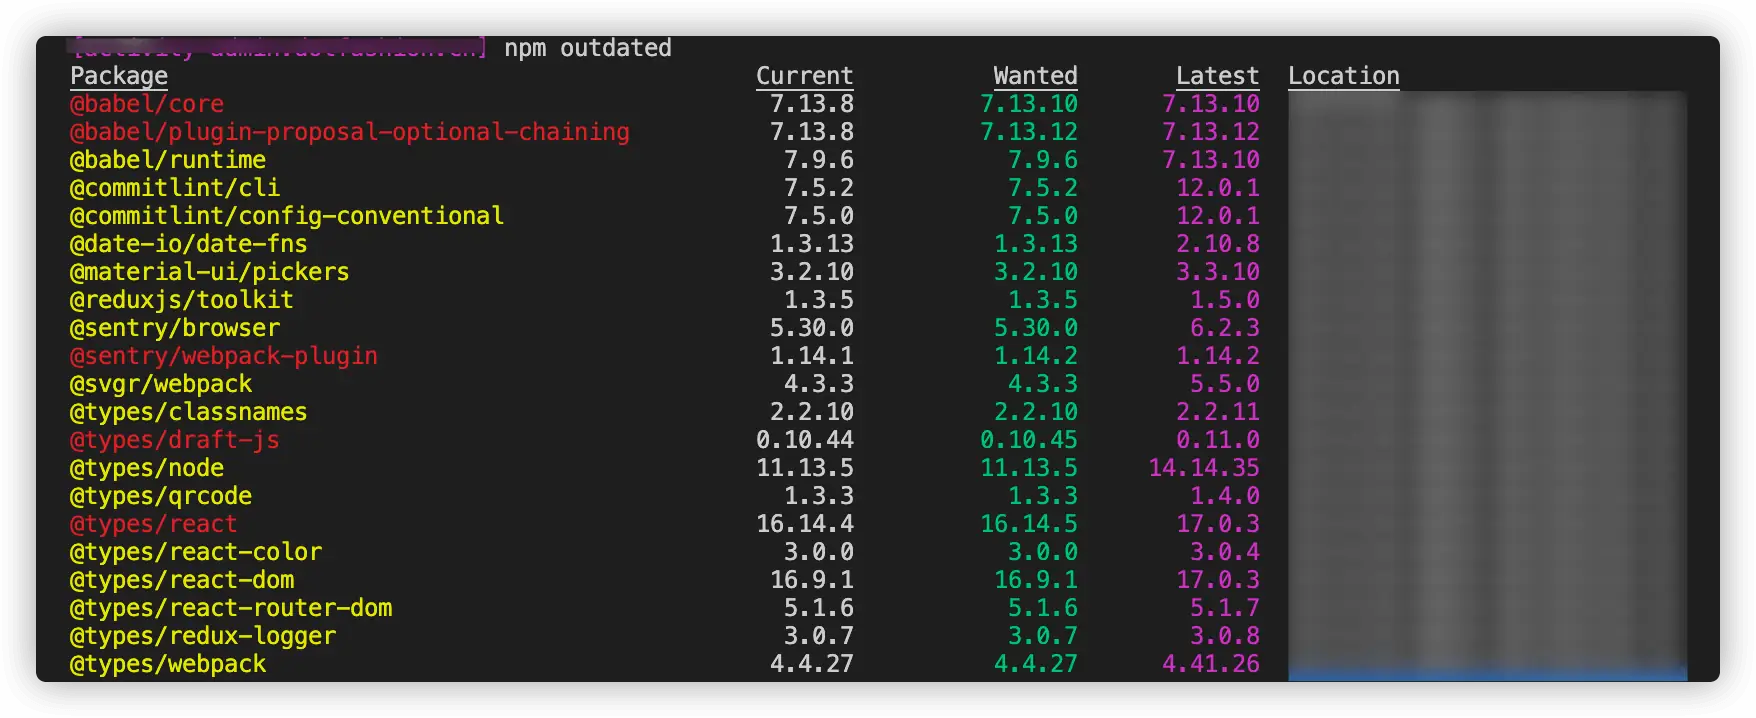
我们的目的是保证团队中使用的依赖一致或者稳定,而不是永远不去更新这些依赖。实际开发场景下,我们虽然不需要每次都去安装新的版本,仍然需要定时去升级依赖版本,来让我们享受依赖包升级带来的问题修复、性能提升、新特性更新。使用 npm outdated 可以帮助我们列出有哪些还没有升级到最新版本的依赖:
- Red means there’s a newer version matching your semver requirements, so you should update now. - 执行
npm update将会安装此部分依赖 - Yellow indicates that there’s a newer version above your semver requirements (usually new major, or new 0.x minor) so proceed with caution.
这里也推荐一个 vscode 插件 - Version Lens
通过脚本进行版本控制可以参考下面 👇
依赖 dependencies
package.json 里配置依赖的地方有很多,比如 dependencies、devDependencies、peerDependencies 等,接下来会介绍下一些区别:
一、dependencies / devDependencies
dependencies 指定了项目运行所依赖的模块,开发环境和生产环境的依赖模块都可以配置到这里。
有一些包有可能你只是在开发环境中用到,例如你用于检测代码规范的 eslint,用于进行测试的 jest,用户使用你的包时即使不安装这些依赖也可以正常运行,反而安装他们会耗费更多的时间和资源,所以你可以把这些依赖添加到 devDependencies 中,这些依赖照样会在你本地进行 npm install 时被安装和管理,但是一般生产环境安装都会添加 --production 参数。只会安装 dependencies 里的依赖。
二、peerDependencies
peerDependencies 用于指定你正在开发的模块所依赖的版本以及用户安装的依赖包版本的兼容性。我们直接拿 antD 来举个例子,package.json 中有如下配置:
{
  "peerDependencies": {
    "react": ">=16.0.0",
    "react-dom": ">=16.0.0"
  }
}
这里的意思是如果要接入 antD 并保证项目稳定的话,React 版本需要保持 16.0.0 以上,而当你开发时依赖的 React 版本是 15.x 的话,npm@2 则强制宿主环境安装对应版本的 react,npm@3 以上会给用户打印警告提示。
In npm versions 3 through 6, peerDependencies were not automatically installed, and would raise a warning if an invalid version of the peer dependency was found in the tree. As of npm v7, peerDependencies are installed by default.
三、optionalDependencies
某些场景下,依赖包可能不是强依赖的,这个依赖包的功能可有可无,当这个依赖包无法被获取到时,你希望 npm install 继续运行,而不会导致失败,你可以将这个依赖放到 optionalDependencies 中,注意 optionalDependencies 中的配置将会覆盖掉 dependencies,所以只需在一个地方进行配置。当然,引用 optionalDependencies 中安装的依赖时,一定要做好异常处理,否则在模块获取不到时会导致报错。
四、bundledDependencies
和以上几个不同,bundledDependencies 的值是一个数组,数组里可以指定一些模块,这些模块将在这个包发布时被一起打包:
{
  "bundledDependencies": ["package1" , "package2"]
}
bin
bin 字段用来指定各个内部命令对应的可执行文件的位置。可以参考 create-react-app、angular-cli、material-ui codemod 这些工具库:
{
  "bin": {
    "myapp": "./cli.js"
  }
}
当安装项目的时候,会建立 cli.js 的软链接到 /usr/local/bin/myapp。如果你仅有一个可执行文件,名字必须跟 package name 一致,写法上有如下两种方式:
{
  "name": "my-program",
  "version": "1.2.5",
  "bin": "./path/to/program"
}

// same as
{
  "name": "my-program",
  "version": "1.2.5",
  "bin": {
    "my-program": "./path/to/program"
  }
}
需要注意的是,脚本文件必须以
#!/usr/bin/env node开头,不然没办法以 node 执行。
files
当你的包是作为依赖提供给别人用的话,可以通过 files 去过滤文件。也可以在包的根目录或子目录中提供一个 .npmignore 文件,这样可以防止列举的文件被包含在内。注意上述 files 字段中包含的文件不能通过 .npmignore 排除。
如果不去定义 files 的话,有些文件是默认会包含的:
- package.json
- README
- LICENSE / LICENCE
- The file in the “main” field
相反,有些文件则一定是排除在外的,比如:
- .git
- .DS_Store
- .npmrc
- node_modules
- package-lock.json (use npm-shrinkwrap.json if you wish it to be published)
- …
.npmignore文件就像.gitignore一样工作。如果.npmignore缺失的话,则将使用.gitignore作为替代 👈
overrides
如果需要在 npm 实现 yarn resolutions 的效果,npm v8 提供了 overrides 属性:
{
  "overrides": {
    "foo": "1.0.0"
  }
}
这样设置后,不管你项目里的依赖树需要哪个版本的 foo,都会被强制安装成 1.0.0,当然我们也可以定义一些子依赖的版本:
{
  "overrides": {
    "baz": {
      "bar": {
        "foo": "1.0.0"
      }
    }
  }
}
我们还可以通过 $ 前缀来更规范的制定版本:
{
  "dependencies": {
    "foo": "^1.0.0"
  },
  "overrides": {
    // BAD, will throw an EOVERRIDE error
    // "foo": "^2.0.0"
    // GOOD, specs match so override is allowed
    // "foo": "^1.0.0"
    // BEST, the override is defined as a reference to the dependency
    "foo": "$foo",
    // the referenced package does not need to match the overridden one
    "bar": "$foo"
  }
}
scripty
当脚本命令比较多的时候,可以通过 scripty 将 scripts 剥离到单独文件中管理,还是看最初的栗子:
"call:tate": "echo tate",
"call:snow": "echo snow",
对应根目录下创建脚本文件,注意在执行脚本时必须拥有可执行权限:
touch scripts/call/tate.sh # 内容为 echo 'tate in scripty'
touch scripts/call/snow.sh

# 添加可执行权限
chmod -R a+x scripts/**/*.sh
然后将 scripts 做修改:
"call:tate": "scripty",
"call:snow": "scripty",
执行命令npm run call:tate后,会打印如下信息:
> npm_scripts@1.0.0 call:tate /Users/tate/Desktop/lazyload-test
> scripty

Executing "/Users/tate/Desktop/lazyload-test/scripts/call/tate.sh":

> echo 'tate in scripty'
当然也可以直接通过 node 来管理,将 shell 脚本改为 node 脚本并执行,shelljs 可以在 node 中使用 shell 命令。
由于目前没有实战,关于如何构建流水线可直接参考小册这里。
yarn & npm
包管理器: 代码通过包(package)或者称为模块(module)的方式来共享。一个包里包含所有需要共享的代码,以及描述包信息的文件,称为 package.json。和 NPM 5 的 package-lock.json 锁文件类似,通过 yarn.lock 记录每一个依赖项的确切版本信息。
| npm 命令 | yarn 命令 | 功能描述 |
|---|---|---|
| npm i | yarn (install) | 根据 package.json 安装所有依赖 |
| npm i (–save/-S) [package] | yarn add [package] | 添加依赖包至 dependencies |
| npm i [–save-dev/-D] [package] | yarn add [–dev/-D] [package] | 添加依赖包至 devDependencies |
| npm i [–global/-g] | yarn global add | 全局安装依赖包 |
| npm uninstall [package] | yarn remove [package] | 移除依赖包 |
| npm update | yarn upgrade | 升级依赖包 |
| npm init | yarn init | 互动式创建 package.json 文件 |
| npm run | yarn run | 运行 package.json 中预定义的脚本 |
yarn 在 mac 的两种安装方式:
# 通过 npm 安装
npm install --global yarn

# 通过 homebrew 安装
brew install yarn
更新方式:
# 通过 Homebrew 更新
brew upgrade yarn

# 通过 yarn 更新
yarn global add yarn
那么再简单对比下 npm install 和 update 的区别,即对于已经安装的包,没有明确版本号的,前者会忽略:
{
  "name":          "my-project",
  "version":       "1.0",                             // install   update
  "dependencies":  {                                  // ------------------
    "already-installed-versionless-module":  "*",     // ignores   "1.0" -> "1.1"
    "already-installed-semver-module":       "^1.4.3" // ignores   "1.4.3" -> "1.5.2"
    "already-installed-versioned-module":    "3.4.1"  // ignores   ignores
    "not-yet-installed-versionless-module":  "*",     // installs  installs
    "not-yet-installed-semver-module":       "^4.2.1" // installs  installs
    "not-yet-installed-versioned-module":    "2.7.8"  // installs  installs
  }
}
另外对于安装 devDependecies 中的依赖还有一些区别:
- npm install 默认会安装,除非添加
--production参数 - npm update 不会默认安装,除非添加
--dev参数
如果要用 npm 查看指定库的所有历史版本信息,可以使用 npm view xxx versions 命令:
$npm view @date-io/date-fns versions

[ '0.0.1',
  '0.0.2',
  '1.0.0',
  ...
  '2.6.1' ]
这里再介绍下关于 npm install 的原理,具体参考这篇文章:

关于 pnpm 可以参考这篇博客 👈
npm 包还有评分机制,包括 popularity、Quality、Maintenance,如何提升指标可以具体查看这里 👈
npx
npx 是 npm@5.2.0 引入的一个命令,那么它是用来干嘛的呢?采用官方的说法就是:
npx is a tool intended to help round out the experience of using packages from the npm registry — the same way npm makes it super easy to install and manage dependencies hosted on the registry, npx makes it easy to use CLI tools and other executables hosted on the registry. It greatly simplifies a number of things that, until now, required a bit of ceremony to do with plain npm
npm link & yalc
npm link (in package dir)
npm link [<@scope>/]<pkg>[@<version>]

alias: npm ln
First, npm link in a package folder will create a symlink in the global folder {prefix}/lib/node_modules/<package> that links to the package where the npm link command was executed. It will also link any bins in the package to {prefix}/bin/{name}. Note that npm link uses the global prefix (see npm prefix -g for its value).
Next, in some other location, npm link <package-name> will create a symbolic link from globally-installed package-name to node_modules/ of the current folder.
cd ~/projects/node-redis    # go into the package directory
npm link                    # creates global link
cd ~/projects/node-bloggy   # go into some other package directory.
npm link redis              # link-install the package

# 取消 link
npm unlink redis
npm install
Now, any changes to ~/projects/node-redis will be reflected in ~/projects/node-bloggy/node_modules/node-redis/. Note that the link should be to the package name, not the directory name for that package.
但用 npm link 引入的依赖由于资源文件不在项目下,导致实际构建或者运行时会报错,此时如果直接将文件复制进依赖目录则能正常运行,因此我们来介绍另一个工具 - yalc 👈
yalc 可以在本地将 npm 包模拟发布,将发布后的资源存放在一个全局存储中。然后可以通过 yalc 将包添加进需要引用的项目中。这时候 package.json 的依赖表中会多出一个 file:.yalc/... 的依赖包,这就是 yalc 创建的特殊引用。同时也会在项目根目录创建一个 yalc.lock 确保引用资源的一致性。因此,测试完项目还需要执行删除 yalc 包的操作,才能正常使用。整个过程相对于 npm link 会更加繁琐一些,要经过发包、添加依赖,结束后也需要做清除操作,但也正因此才避免了 npm link 的一些问题。
- 发布依赖
yalc publish发布包到仓库(store)yalc push可以快速的更新所有依赖
- 添加依赖
yalc add my-package向项目里添加依赖,该步骤会把之前发布到仓库里的依赖复制到项目的.yalc目录中,并且会向package.json注入file:.yalc/my-package依赖- 也可以使用 link 方式引用依赖包,
yalc add my-package --link。use –link option to add alink:dependency instead offile:
- 更新依赖
yalc update my-package来更新仓库里的某个依赖yalc update来查找yalc.lock更新所有依赖
- 移除依赖
yalc remove my-package会移除包在package.json和yalc.lock里的信息yalc remove --all移除项目中所有依赖
- 查看仓库信息
yalc installations show my-package显示哪些包被安装yalc installations clean my-package进行 unpublish 操作
抛弃 run-script
在这之前,npm 生态越来越倾向于将 devDependencies 安装包作为项目本地(project-local)依赖安装,而不是全局安装,这样就更加方便去管理像 gulp、webpack 这些工具的版本,比如 webpack 本地安装时就推荐局部安装:
对于大多数项目,我们建议本地安装。这可以在引入突破式变更(breaking change)版本时,更容易分别升级项目。通常会通过运行一个或多个 npm scripts 以在本地 node_modules 目录中查找安装的 webpack,想要运行本地安装的 webpack,你可以通过 node_modules/.bin/webpack 来访问它的 bin 版本。详见这里 👈
辣么此前要这么做的话,有以下两种方法:
1、在 run-script 中申明,并执行 npm build
"scripts": {
  "build": "webpack --config webpack.config.js"
}
2、直接找到项目本地的位置并执行
./node_modules/.bin/webpack --config webpack.config.js
抛开以上两种写法而使用 npx 的话,只用输入下面命令即可:
npx webpack --config webpack.config.js
Executing one-off commands
npx 可以让你去执行 npm 包里的二进制文件而不用去全局安装他们,因此利用 npx 还可以实现 Executing one-off commands,即执行一次性命令。npx is the last thing you need to globally install: > npm i -g npx (this command also updates npx)。
下面举个 create-react-app 栗子,$ npx create-react-app my-cool-new-app 安装了一个临时的包并运行, 没有污染全局安装而且命令简单:

下列是一些比较有趣的包,可以用 npx 尝试一番 😜,更多命令可以参考 awesome-npx:
[~] npx cowsay Tate
npx: 10 安装成功,用时 1.223 秒
 _____
< Tate >
 -----
        \   ^__^
         \  (oo)\_______
            (__)\       )\/\
                ||----w |
                ||     ||
[~] npx happy-birthday -u snow
npx: 2 安装成功,用时 0.776 秒

🎂
お誕生日おめでとう、snow!
🎉
npx 还支持一些其他的参数:
$ npx -p cowsay -p lolcatjs -c 'echo "$npm_package_name@$npm_package_version" | cowsay | lolcatjs'installs both cowsay and lolcatjs, and gives the script access to a slew of$npm_variables from run scripts.
控制 node 版本
node 版本的控制之前一般都采用 nvm、n 等版本管理工具,现在的话 npx 就能做到,不过只是临时地去用指定 node 版本:
npx -p node@<version>
[~] npx node@6 -v
v6.17.1
[~] npx -p node@7 -- node -v
v7.10.1
[~] node -v
v11.14.0
下图是 n 的使用示例,n <version> 就能安装:
nrm
nrm 可以方便管理 npm 源:
nrm ls

# npm -----  https://registry.npmjs.org/
# yarn ----- https://registry.yarnpkg.com
# cnpm ----  http://r.cnpmjs.org/
# taobao --  https://registry.npm.taobao.org/
# nj ------  https://registry.nodejitsu.com/
# skimdb -- https://skimdb.npmjs.com/registry
# switch registry to cnpm
nrm use cnpm
# Registry has been set to: http://r.cnpmjs.org/
我们还可以添加和删除私服的 npm 镜像地址:
# 具体可以查看 nrm help
nrm add test http://XXX:4873/
nrm del test
git hooks 实践示例
// package.json
{
   "husky": {
    "hooks": {
      "pre-merge-commit": "node build/bin/pre-merge-commit.js",
      "pre-commit": "node build/bin/pre-commit.js",
      "pre-push": "node build/bin/pre-push.js",
      "commit-msg": "commitlint -E HUSKY_GIT_PARAMS"
    }
  }
}
pre-commit
const shell = require('shelljs')
const fs = require('fs')
const path = require('path')

const STARTCOLOR = '\033[31m'
const ENDCOLOR = '\033[0m'
const CYAN_COLOR = '\x1B[36m'
shell.config.silent = true

/**
 * 判断是否安装了 Git
 */
function checkGit() {
  if (!shell.which('git')) {
    shell.echo(`${STARTCOLOR}==================================================${ENDCOLOR}`)
    shell.echo(`${STARTCOLOR}当前环境没有安装 Git,请安装后再试!${ENDCOLOR}`)
    shell.echo(`${STARTCOLOR}==================================================${ENDCOLOR}`)
    shell.exit(1)
  }
}

/**
 * 校验当前用户邮箱是否符合公司规范
 */
function checkEmail() {
  const VALID_EMAIL_SUFFIX = '@xxx.com'
  const CURRENT_EMAIL = shell.exec('git config --get user.email', { silent: true }).trim()

  if (!CURRENT_EMAIL.endsWith(VALID_EMAIL_SUFFIX)) {
    shell.echo(`${STARTCOLOR}==================================================${ENDCOLOR}`)
    shell.echo(`${STARTCOLOR}当前邮箱格式不正确,请配置为 @xxx.com 邮箱!${ENDCOLOR}`)
    shell.echo(`${STARTCOLOR}git config --local user.name 名字${ENDCOLOR}`)
    shell.echo(`${STARTCOLOR}git config --local user.email 邮箱${ENDCOLOR}`)
    shell.echo(`${STARTCOLOR}==================================================${ENDCOLOR}`)
    shell.exit(1)
  }
}

/**
 * 校验是否存在冲突文件
 */
function checkConflict() {
  const REG = /(^|\r|\n|\r\n)<{7,8} HEAD|^={7,8}(\r|\n|\r\n|$)|>{7,8}.*(\r|\n|\r\n|$)/gm
  const CHANGED = shell.exec('git diff --cached --name-only --relative', { silent: true }).stdout.trim().split('\n')
  const EXCLUDE = /node_modules/g

  if (CHANGED) {
    const filter = CHANGED.filter(file => {
      if (!EXCLUDE.test(file)) return file
    })
    const existsFiles = []

    for (const file of filter) {
      try {
        fs.accessSync(file, fs.constants.F_OK)
        existsFiles.push(file)
      } catch (err) {}
    }

    const conflict = shell.grep('-l', REG, existsFiles).stdout.trim()
    if (conflict) {
      shell.echo(`${STARTCOLOR}==================================================${ENDCOLOR}`)
      shell.echo(`${STARTCOLOR}${conflict}${ENDCOLOR}\n`)
      shell.echo(`${STARTCOLOR}以上文件存在冲突未处理,请处理后再提交!${ENDCOLOR}`)
      shell.echo(`${STARTCOLOR}==================================================${ENDCOLOR}`)
      shell.exit(1)
    }
  }
}

function checkCode(isFix = false) {
  const ESLINT_PATH = path.resolve(__dirname, '../../node_modules/.bin/eslint')
  const ESLINTRC_PATH = path.resolve(__dirname, '../../.eslintrc.js')
  const CHECK_TIME = '2020/01/01'
  const SUFFIX_FILE_REG = /\.vue?$|\.js?$/ // 文件后缀
  const CHECK_FOLDER = ['examples/', 'packages/', 'src/'] // 只检查这些目录
  // const EXCLUDE_FOLDER_REG = // // 过滤掉的目录

  function getStatusFile() {
    return new Promise((resolve, reject) => {
      shell.exec(`git status -s ${CHECK_FOLDER.join(' ')}`, { silent: true }, (code, stdout, stderr) => {
        let files = stdout
        files = files
          .split('\n')
          .filter(file => {
            const head = file.charAt(0)
            return /[ACMR]/.test(head) && SUFFIX_FILE_REG.test(file)
          })
          .map(str => {
            const length = str.split(' ').length - 1
            return str.split(' ')[length]
          })

        files.length ? resolve(files) : isFix ? reject('> Git 暂存区没有符合文件,无法执行修复命令') : reject('> Git 暂存区没有需要校验的文件,跳过执行')
      })
    })
  }

  function getNewFiles(files) {
    return files.map(file => {
      return new Promise((resolve, reject) => {
        shell.exec(`git log --all --before=${CHECK_TIME} -n1 -- ${file}`, { silent: true }, (code, stdout, stderr) => {
          resolve({
            newFile: stdout === '' ? true : false,
            file,
          })
        })
      })
    })
  }

  function doEsLint(filenames) {
    return Promise.all(filenames).then(res => {
      const checkFiles = []

      for (const item of res) {
        if (item.newFile) checkFiles.push(item.file)
      }

      if (checkFiles.length) {
        return new Promise((resolve, reject) => {
          shell.exec(`${ESLINT_PATH} -c ${ESLINTRC_PATH} ${checkFiles.join(' ')} ${isFix ? '--fix': ''}`, { silent: true }, (code, stdout, stderr) => {
            resolve({
              content: stdout || stderr,
            })
          })
        })
      } else {
        isFix ? reject('> Git 暂存区没有符合文件,无法执行修复命令') : reject('> Git 暂存区没有需要校验的文件,跳过校验')
      }
    })
  }

  getStatusFile()
    .then(getNewFiles)
    .then(doEsLint)
    .then((res) => {
      if (isFix) {
        shell.echo('> 已修复 ES Lint「 代码风格 」警告,请再次检查代码后执行 git add & git commit\n')
      } else if (res && res.content) {
          shell.echo(`${CYAN_COLOR}${res.content}${CYAN_COLOR}`)
          shell.echo(`${STARTCOLOR}以上代码不符合代码风格,请处理后再提交!\n${ENDCOLOR}`)
          shell.echo('ES Lint 检测到代码风格不统一,可参考:')
          shell.echo('ES Lint 官方文档:https://cn.eslint.org/docs/rules/')
          // shell.echo('注1:一键修复可执行 `npm run eslint-fix`(建议尝试手动修复,养成代码风格再使用)')
          shell.echo('注2:如有规则未覆盖到的情况,请联系 lintianhao 处理\n')
          shell.exit(1)
      } else {
          shell.echo('> ES Lint 校验通过!')
      }
    })
    .catch((msg) => {
      shell.echo(msg)
    })
}

if (process.argv.includes('--fix')) {
  shell.echo('> ES Lint 执行修复命令,请稍等...')
  checkCode(true)
} else {
  checkGit()
  checkEmail()
  checkConflict()

  shell.echo('> ES Lint 校验中,请稍等...')
  checkCode()
}
pre-merge-commit / pre-push
const shell = require('shelljs')

/**
 * 校验合并的分支,不能向 master 和 dev 分支合并代码
 */
function checkCommitBranch() {
  let branch = shell.exec('git rev-parse --symbolic --abbrev-ref HEAD', { silent: true }).stdout.trim()
  let forBiddenBranch = ['master', 'dev']
  if (forBiddenBranch.includes(branch)) {
    shell.echo(`> 禁止往${forBiddenBranch.join(', ')} merge 代码,请使用merge requests`)
    shell.exit(1)
  }
}

checkCommitBranch()
版本控制实践
// package.json
{
  "scripts": {
    "pub": "npm run test && sh path/git.sh && sh path/release.sh",
  }
}
git.sh
git checkout dev

check () {
  if test -n "$(git status --porcelain)"; then
    echo 'Unclean working tree. Commit or stash changes first.' >&2;
    exit 128;
  fi

  if ! git fetch --quiet 2>/dev/null; then
    echo 'There was a problem fetching your branch. Run `git fetch` to see more...' >&2;
    exit 128;
  fi

  if test "0" != "$(git rev-list --count --left-only @'{u}'...HEAD)"; then
    echo 'Remote history differ. Please pull changes.' >&2;
    exit 128;
  fi
}


check
echo 'No conflicts.' >&2

git checkout master
git pull
git merge dev
git push --no-verify

check
echo 'merge dev to master.' >&2
release.sh
VERSION_TYPE=('major' 'minor' 'patch')

# package.json version
PACKVERSION=''
PACKVERSIONARR=''

re="\"(version)\": \"([^\"]*)\""
# get package.json version
while read -r l; do
  if [[ $l =~ $re ]]; then
    value="${BASH_REMATCH[2]}"
    PACKVERSION="$value"
  fi
done < package.json

PACKVERSIONARR=(${PACKVERSION//./ })

# version
VERSION=`npx select-version-cli`
read -p "Releasing $VERSION - are you sure? (y/n)" -n 1 -r
echo

if [[ $REPLY =~ ^[Yy]$ ]] && [[ ! $VERSION =~ '-' ]]; then

  PUBLISHARR=(${VERSION//./ })

  # patch, minor, major
  PUBLISH_TYPE=
  i=0
  while [[ $PUBLISH_TYPE == "" ]]; do
    if [ ${PACKVERSIONARR[i]} -ne ${PUBLISHARR[i]} ]; then
      PUBLISH_TYPE=${VERSION_TYPE[i]}
    fi
    let i+=1
  done

  echo "Releasing $VERSION ...$PUBLISH_TYPE"

  # 更新 package.json 版本号
  npm version $VERSION --message "feat: version $VERSION"

  # build
  VERSION=$VERSION npm run build

  # tag
  if [ $PUBLISH_TYPE == 'minor' ] || [ $PUBLISH_TYPE == 'major' ]; then
    git tag "v$VERSION"
    git push origin refs/tags/"v$VERSION" --no-verify
  fi

  # commit
  git add .
  git commit -m "feat: build $VERSION"
  git push --no-verify

  # publish
  npm publish
else
  echo 'please select patch, minor, major'
fi
参考链接
- 掘金小册 - 用 npm script 打造超溜的前端工作流 By 王仕军
- npm scripts 使用指南 By 阮一峰
- 使用 npm scripts 构建项目 By 青春样
- yarn 官网
- Npm vs Yarn 之备忘详单 By 晚晴幽草轩轩主
- npm5 新版功能特性解析及与 yarn 评测对比 By 马铖
- Package.json 中库的版本号详解 By ragingDream
- npm install vs. update - what’s the difference? - stackoverflow
- Introducing npx: an npm package runner By Kat Marchán
- 前端工程化 - 剖析npm的包管理机制(完整版) by ConardLi