
VS Code 插件及小技巧
断点调试
本节主要针对 node 进行调试,需要额外插件一枚: Debugger for Chrome,可以配合 Chrome 进行调试。
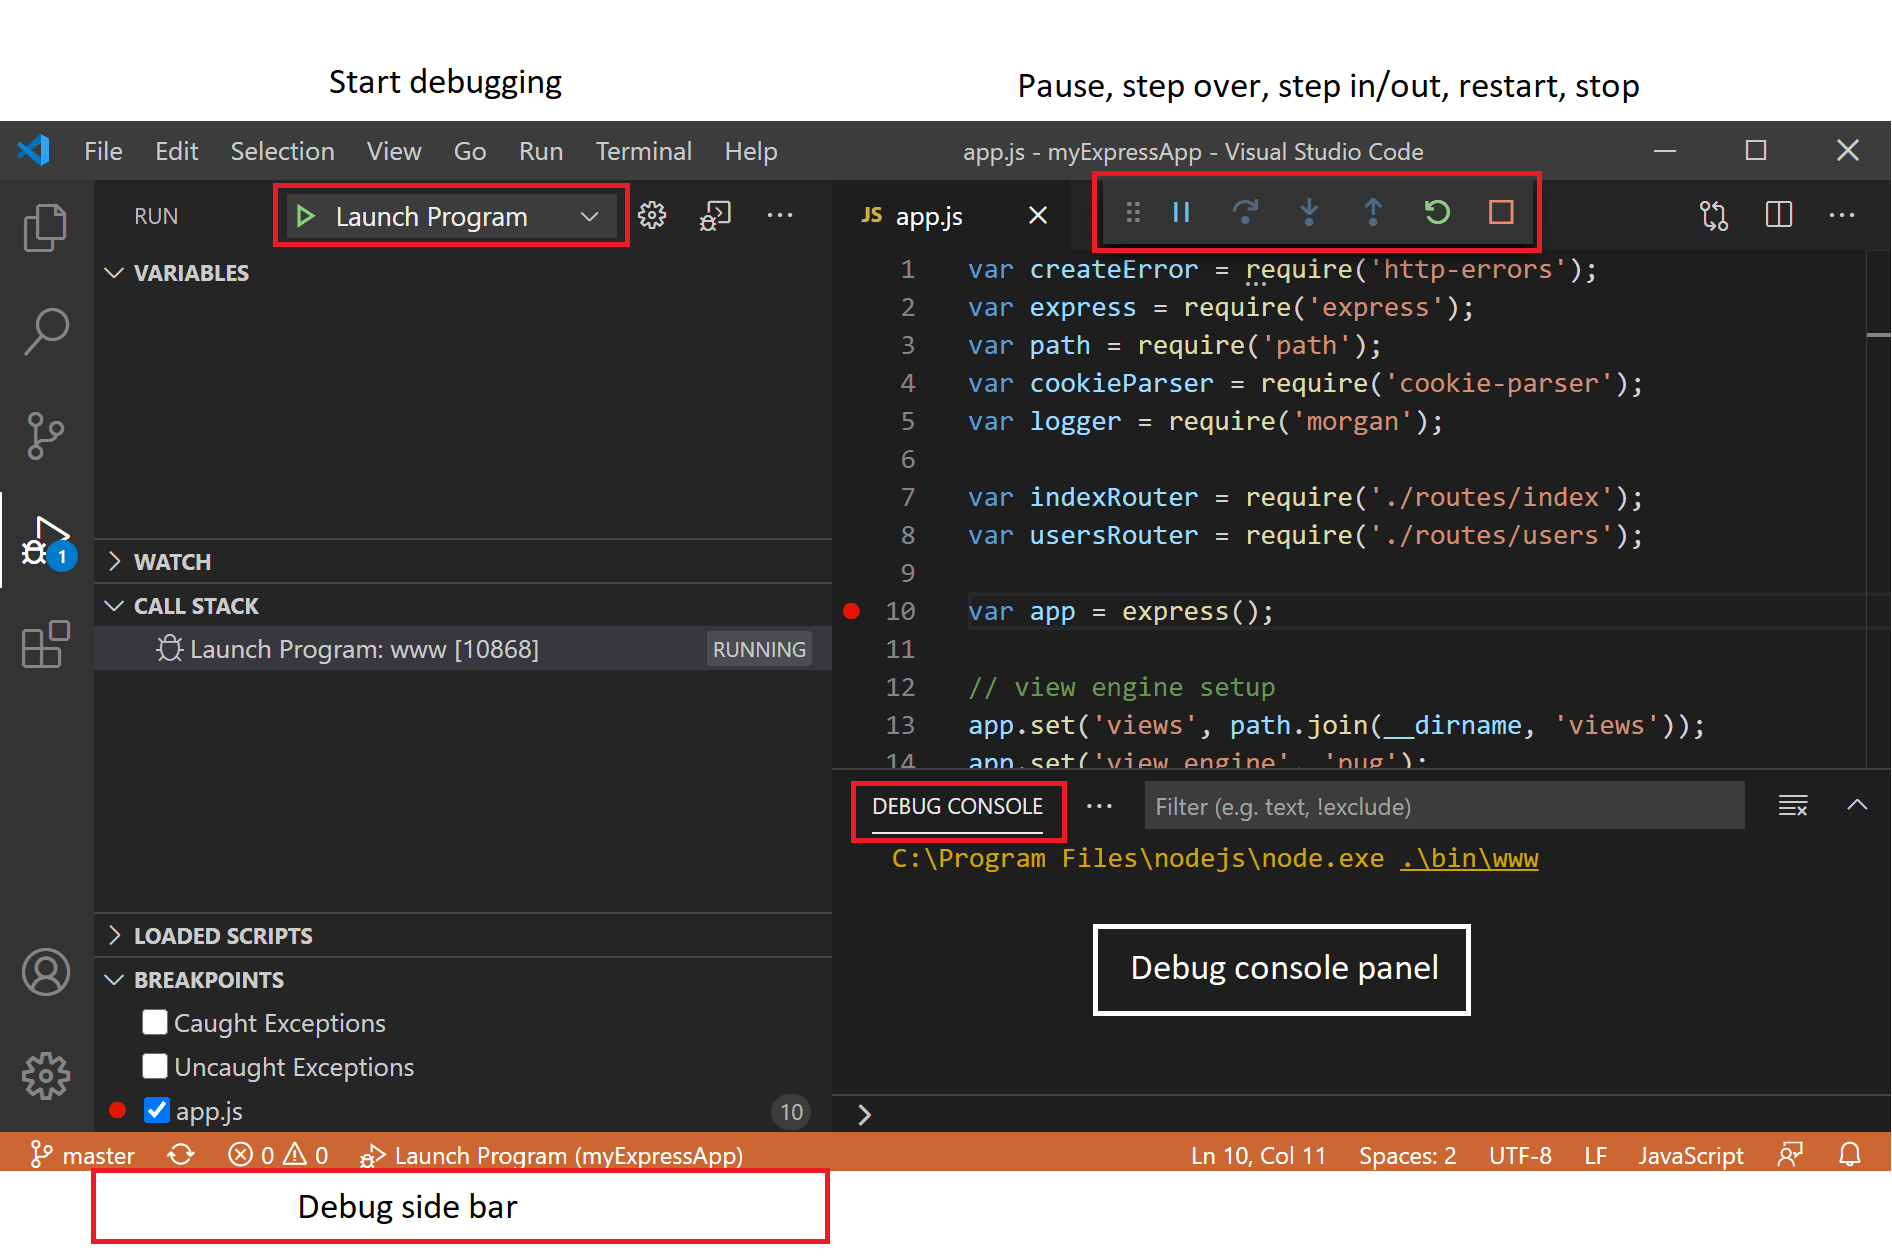
launch.json 配置
launch.json 文件配置里的有两个重要的属性 type 和 request,取值为:
- type - 设置需要启动的调试类型,选项是根据所安装的 debug 插件决定,如 “node” for built-in node debugger
- request - 设置需要启动的 request 类型,有两种取值:
- launch - 启动一个独立的具有 debug 模式的程序
- attach - 附加于已启动的程序并进行 debug
当配置完成后,会在根目录下自动生成文件 .vscode/launch.json。配置参数选项有很多,可以直接参考官网文档。
{
  "version": "0.2.0",
  "configurations": [
    {
      "name": "Launch",
      "type": "node",
      "request": "launch",
      "program": "${workspaceRoot}/app.js",
      "stopOnEntry": false,
      "args": [],
      "cwd": "${workspaceRoot}",
      "preLaunchTask": null,
      "runtimeExecutable": null,
      "runtimeArgs": [
        "--nolazy"
      ],
      "env": {
        "NODE_ENV": "development"
      },
      "externalConsole": false,
      "sourceMaps": false,
      "outDir": null
    },
    {
      "name": "Attach",
      "type": "node",
      "request": "attach",
      "port": 5858,
      "address": "localhost",
      "restart": false,
      "sourceMaps": false,
      "outDir": null,
      "localRoot": "${workspaceRoot}",
      "remoteRoot": null
    }
  ]
}
此处作为测试,作如下配置:
{
  // Use IntelliSense to learn about possible attributes.
  // Hover to view descriptions of existing attributes.
  // For more information, visit: https://go.microsoft.com/fwlink/?linkid=830387
  "version": "0.2.0",
  "configurations": [
    {
      "type": "node",
      "request": "launch",
      "name": "Launch myTest",
      "program": "${workspaceFolder}/index.js"
    },
    {
      "type": "node",
      "request": "attach",
      "name": "Attach myTest",
      "port": 9229
    }
  ]
}
launch
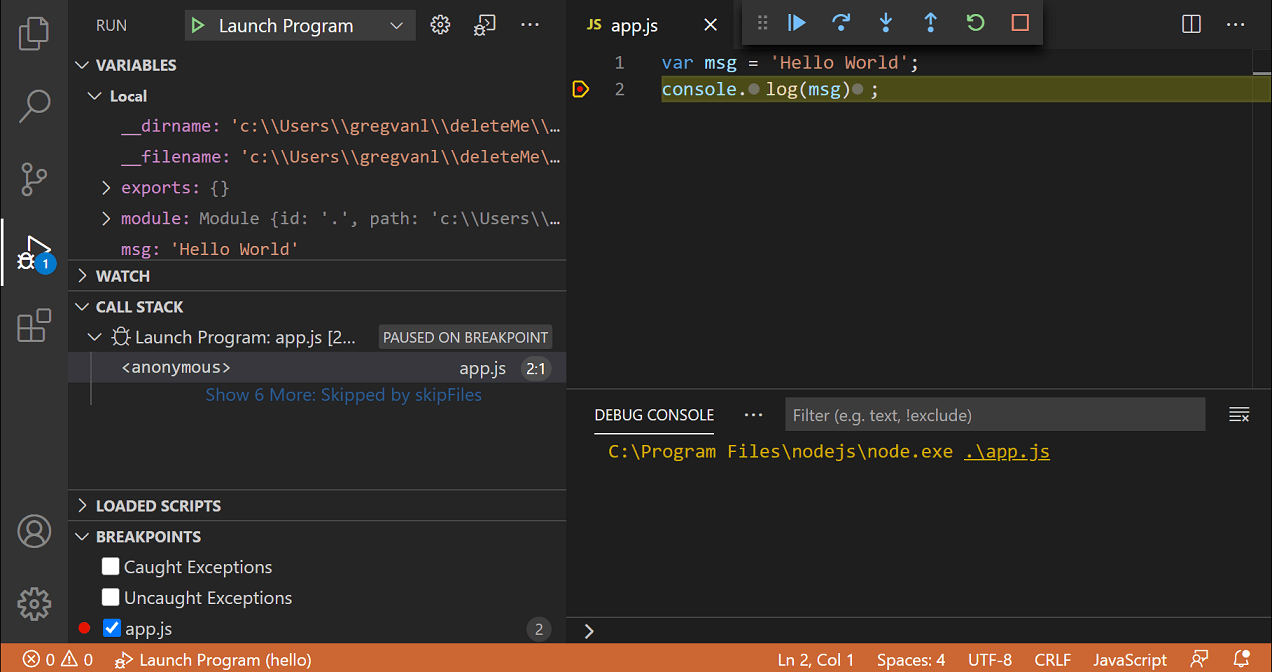
根据 launch.json 配置选项,选择 “Launch myTest” 模式并执行,此时控制台输出:
/usr/local/bin/node --inspect-brk=11561 index.js
Debugger listening on ws://127.0.0.1:11561/ba83731f-67bb-484e-8e7d-4ed842f62a60
Debugger attached.
listening on port 8080
此时 Chrome 上打开 localhost:8080 即可进行断点调试,但代码有修改的话,必须重新监听。
attach
根据 launch.json 配置选项,选择 “Attach myTest” 模式,但注意在执行 debug 之前必须让程序启动,否则会报错:
Cannot connect to runtime; make sure that runtime is in 'legacy' debug mode.
这里使用 nodemon 做示例,但根据协议需要新增模式参数的选择:
- Legacy Protocol - –debug 模式,默认 5858 端口,一般用于旧版 Node (< 6.3)
- Inspector Protocol - –inspect 模式,默认 9229 端口,一般用于新版 Node (>= 6.3)
nodemon --debug index.js

# 或
nodemon --inspect index.js
监听之后执行 debug,终端会显示 “Debugger attached.”,另外底边栏会有 Auto Attach:Off 状态,点击可切换为 On 状态,即当内容有修改后,会自动进行 attach 操作。
断点
单击编辑器侧边缘即可为所在行添加或删除断点,调试时在 BREAKPOINTS 区域中也可对断点进行操作(enable/disable/reapply)。
- 断点一般显示为红色圆圈
- 被取消的断点显示为灰色圆圈
- 调试启动后,不能被注册的断点显示为灰色的空心圆圈
也可以通过代码语句 debugger 设置断点:
app.get('/', function(req, res) {
  console.log('tate')
  debugger // 相当于断点
  res.send('bbb')
})
Markdown 转 PDF
这里推荐使用 Markdown PDF 插件,当然它也可以转 html、jpeg、png。需要注意的是,它会尝试安装 chromium,如果安装失败的话,一定要自己去 settings.json 里设置 executablePath 执行路径:
<!-- macOS -->
"markdown-pdf.executablePath": "/Applications/Google Chrome.app/Contents/MacOS/Google Chrome",
<!-- windows -->
<!-- All \ need to be written as \\ (Windows) -->
"markdown-pdf.executablePath": "C:\\Program Files (x86)\\Google\\Chrome\\Application\\chrome.exe"
这里我们可以直接用它设置的样式,也可以自定义:
"markdown-pdf.styles": [
  "C:\\Users\\<USERNAME>\\Documents\\markdown-pdf.css",
  "/home/<USERNAME>/settings/markdown-pdf.css",
],
它也拥有其他丰富的配置项,详见文档:
"markdown-pdf.displayHeaderFooter": false,
"markdown-pdf.outputDirectory": "/Users/tate/Desktop"
之后我们直接在 command palette (快捷键 cmd+shift+p)中输入 export 关键词,选择 markdown-pdf: Export (pdf) 即可。
settings.json也可以直接通过 command palette 来检索打开
code 命令
这里介绍一个炒鸡好用的功能,如果我们想在终端通过命令来调用 VS Code 来编辑一些文件,可以在编辑器打开命令面板( ⇧⌘P ),然后找到 Install ‘code' command in PATH 进行安装,之后我们就可以使用 code 命令啦:
# 若不存在则创建
code README.md

# 还可以一次性打开多个文件
code file1 file2 file3

# 也支持打开文件目录
code folder1 folder2
Multi-root Workspaces
可以直接参考官方文档这一节。一般情况下我们可以直接在编辑器上新增工作区,当然我们也可以用命令行:
code --add myProject
如果是新建的工作区,当我们退出 vscode 时会提示保存,并会自动创建一个 yourname.code-workspace 的配置文件:
{
  "folders": [
    {
      // Source code
      "name": "Product", // name 可以语义替换原本的项目名称
      "path": "vscode"
    },
    {
      // Docs and release notes
      "name": "Documentation",
      "path": "vscode-docs"
    }
  ]
}
之后只需要双击这个文件就可以打开这个工作区了,当然也可以直接用 code 命令来操作:
code path/yourname.code-workspace
jsconfig.json
这里额外提到下 vscode 的 jsconfig.json 文件,目录中存在该文件表示该目录是 JavaScript 项目的根目录。jsconfig.json 文件指定根文件和 JavaScript 语言服务提供的功能选项。具体可以参考 vscode 官方文档。
jsconfig.json 源于
tsconfig.json,是 TypeScript 的配置文件。jsconfig.json 相当于 tsconfig.json 的allowJs属性设置为 true