Skeleton Screen
什么是骨架屏
网页加载通常的做法是采用菊花图,可以通过 CSS 来制作各种 loading 动画,用来提升用户在等待时间内的感知体验。更多可以参见这里 👈👈👈:

骨架屏(skeleton screen) 则体验上会比菊花图更好,在数据加载完成之前会通过”骨架”来填充页面,例如:
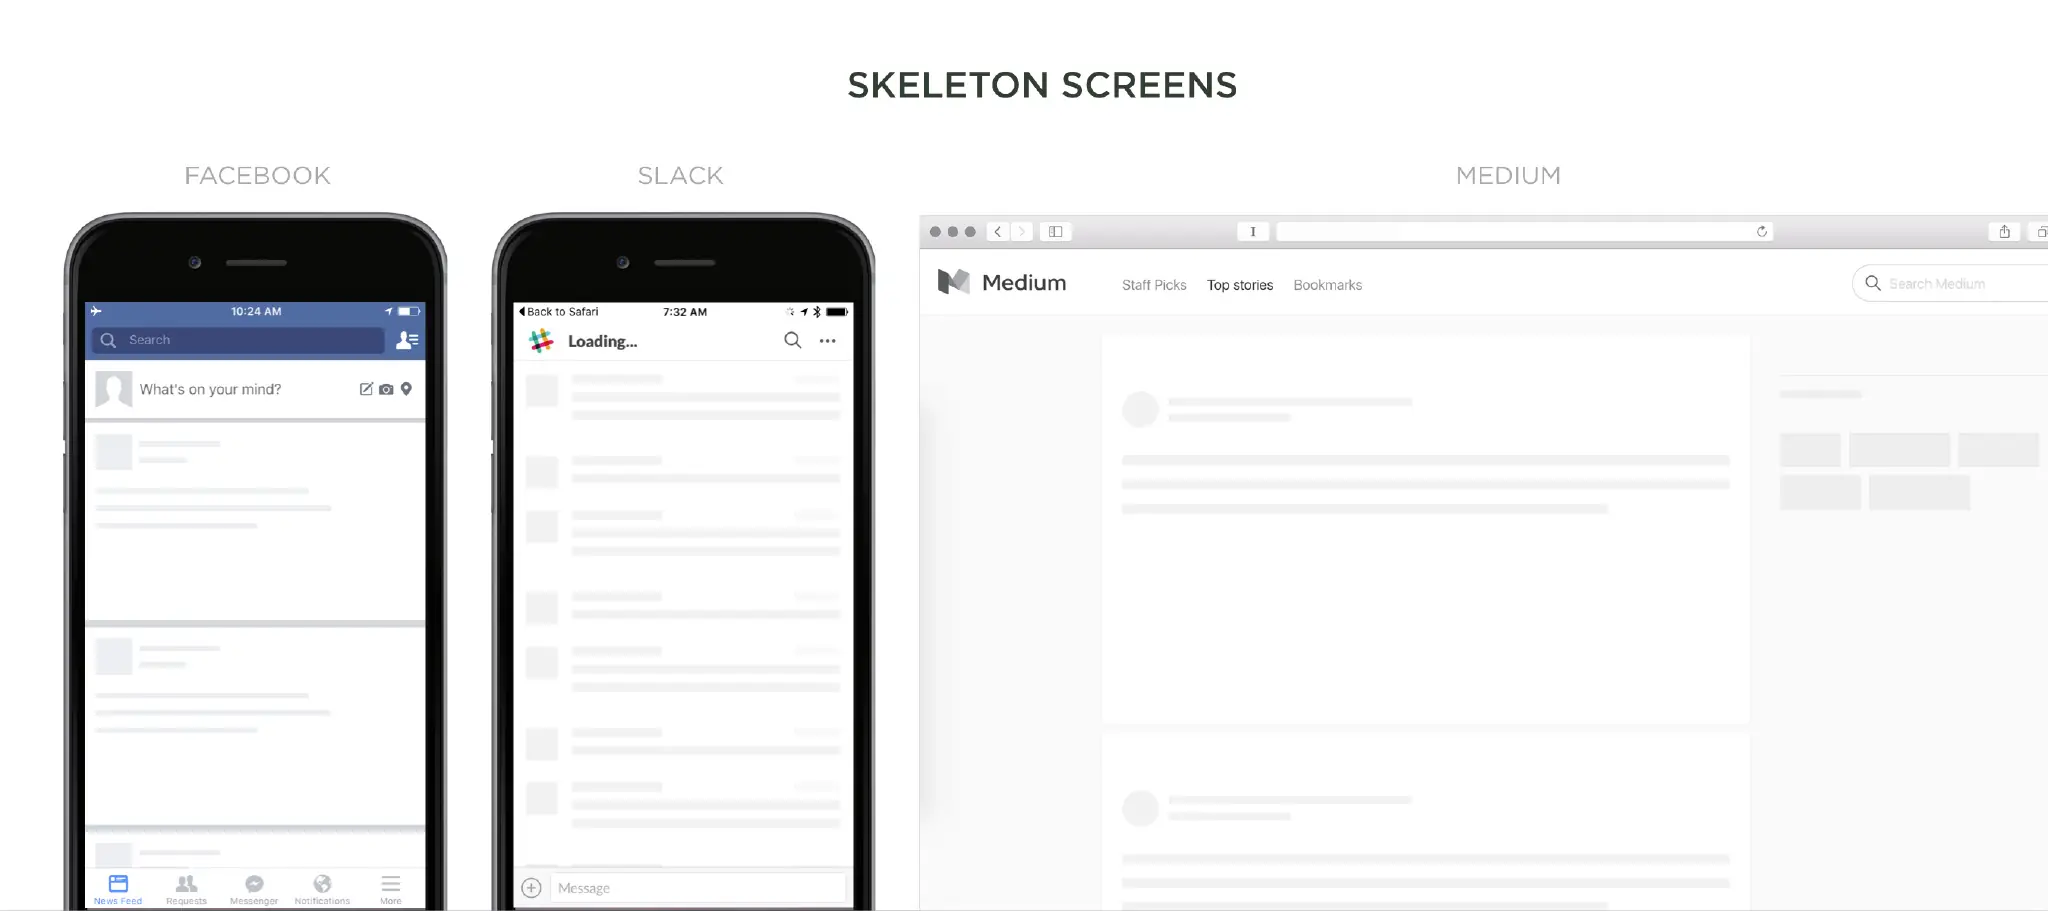
骨架屏示例
以 facebook 加载为例,参见 codepen:

<div class="timeline-wrapper">
<div class="timeline-item">
  <div class="animated-background">
    <div class="background-masker header-top"></div>
    <div class="background-masker header-left"></div>
    <div class="background-masker header-right"></div>
    <div class="background-masker header-bottom"></div>
    <div class="background-masker subheader-left"></div>
    <div class="background-masker subheader-right"></div>
    <div class="background-masker subheader-bottom"></div>
    <div class="background-masker content-top"></div>
    <div class="background-masker content-first-end"></div>
    <div class="background-masker content-second-line"></div>
    <div class="background-masker content-second-end"></div>
    <div class="background-masker content-third-line"></div>
    <div class="background-masker content-third-end"></div>
  </div>
</div>
.timeline-item {
  background: #fff;
  border: 1px solid;
  border-color: #e5e6e9 #dfe0e4 #d0d1d5;
  border-radius: 3px;
  padding: 12px;
  margin: 0 auto;
  max-width: 472px;
  min-height: 200px;
}


@keyframes placeHolderShimmer{
  0%{
    background-position: -468px 0
  }
  100%{
    background-position: 468px 0
  }
}

.animated-background {
  animation-duration: 1s;
  animation-fill-mode: forwards;
  animation-iteration-count: infinite;
  animation-name: placeHolderShimmer;
  animation-timing-function: linear;
  background: #f6f7f8;
  background: linear-gradient(to right, #eeeeee 8%, #dddddd 18%, #eeeeee 33%);
  background-size: 800px 104px;
  height: 96px;
  position: relative;
}


.background-masker {
  background: #fff;
  position: absolute;
}

/* Every thing below this is just positioning */

.background-masker.header-top,
.background-masker.header-bottom,
.background-masker.subheader-bottom {
  top: 0;
  left: 40px;
  right: 0;
  height: 10px;
}

.background-masker.header-left,
.background-masker.subheader-left,
.background-masker.header-right,
.background-masker.subheader-right {
  top: 10px;
  left: 40px;
  height: 8px;
  width: 10px;
}

.background-masker.header-bottom {
  top: 18px;
  height: 6px;
}

.background-masker.subheader-left,
.background-masker.subheader-right {
  top: 24px;
  height: 6px;
}


.background-masker.header-right,
.background-masker.subheader-right {
  width: auto;
  left: 300px;
  right: 0;
}

.background-masker.subheader-right {
  left: 230px;
}

.background-masker.subheader-bottom {
  top: 30px;
  height: 10px;
}

.background-masker.content-top,
.background-masker.content-second-line,
.background-masker.content-third-line,
.background-masker.content-second-end,
.background-masker.content-third-end,
.background-masker.content-first-end {
  top: 40px;
  left: 0;
  right: 0;
  height: 6px;
}

.background-masker.content-top {
  height:20px;
}

.background-masker.content-first-end,
.background-masker.content-second-end,
.background-masker.content-third-end{
  width: auto;
  left: 380px;
  right: 0;
  top: 60px;
  height: 8px;
}

.background-masker.content-second-line  {
  top: 68px;
}

.background-masker.content-second-end {
  left: 420px;
  top: 74px;
}

.background-masker.content-third-line {
  top: 82px;
}

.background-masker.content-third-end {
  left: 300px;
  top: 88px;
}
自动生成
骨架屏的生成方式有以下几种:
- 如上述的使用图片、svg 或者手动编写骨架屏代码;
- 通过预渲染手动书写的代码生成相应的骨架屏,比如 vue-skeleton-webpack-plugin,通过 vueSSR 结合 webpack 在构建时渲染写好的 vue 骨架屏组件,将预渲染生成的 DOM 节点和相关样式插入到最终输出的 html 中;
- 饿了么通过一个 webpack 插件 page-skeleton-webpack-plugin 的方式与项目开发无缝集成,属于在自动生成骨架屏方面做的非常强大的了,并且可以启动 UI 界面专门调整骨架屏,但是在面对复杂的页面也会有不尽如人意的地方,而且生成的骨架屏节点是基于页面本身的结构和 CSS,存在嵌套比较深的情况,体积不会太小。
上面的插件使用起来还是有局限性,可以参考这篇文章,通过不同的思路来实现自动生成骨架屏,代码仓库 dps 点这里:
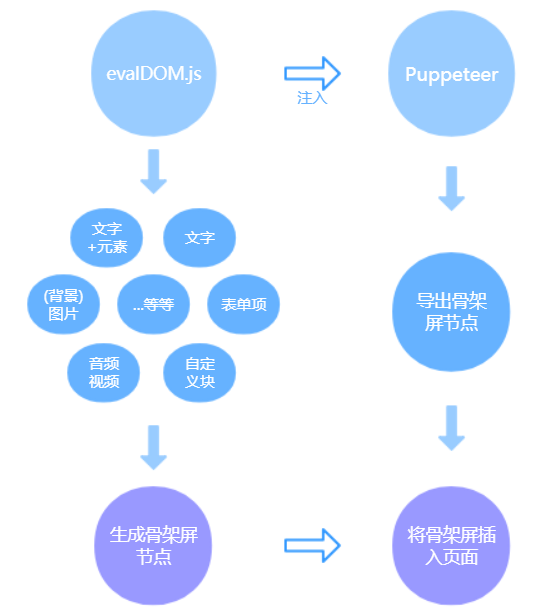
效果图: